How to Log into RCN Webmail? Instructions to Add Your RCN Email Account on Various Devices
Astound Broadband offers an online mailing service called RCN Webmail. The corporation provides telephone, DSL internet services, cable television, and other telecommunication services in various states of the USA like California, Illinois, Massachusetts, New York, etc.
If you are an RCN subscriber and already have an email account, you can log into your RCN Web Mail account by simply using your username (email address) and password on the webmail.rcn.com sign-in page.
Doing RCN Email login is as simple as logging into PeoplePC Webmail, you just have to enter your login credentials and it will be done. However, if you’re not sure how to do it or are having trouble logging in, you can follow the instructions below to discover the same.
So, without talking much, let’s jump right into the steps!
RCN Webmail Login
As you already know RCN Webmail is an email service provided by Astound Broadband. You can easily use this email service to access or send emails, as with any other email service provider. Further, accessing this email is an effortless process.
In case you are wondering how do I access my RCN email, you need not worry about that as well. Stated below is the RCN email login process that you need to follow and you will be able to use your email account.
So, without further ado, let’s see the rcn.com webmail login steps:
- First off, launch the browser on your device and go to the RCN Webmail login page.
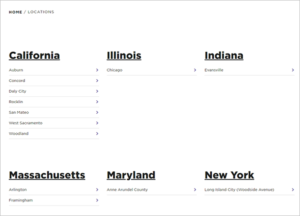
- Upon reaching the given link, you have to choose the city where you are residing.
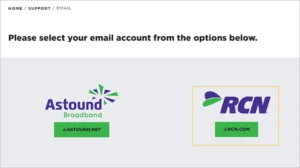
- 3. Thereafter, click on the Webmail option present in the top menu bar of the following page.

- 4. Next, since you are trying to log into the RCN email account, select the RCN Webmail option on the next page.
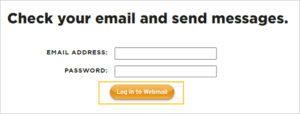
- 5. Then, you will be directed to the rcn.com Webmail login page. There, enter your RCN email address and password in their respective text fields.
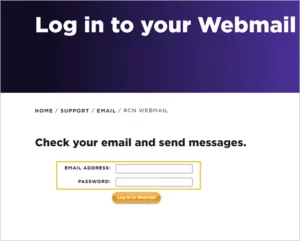
- 6. Finally, click on the Log In To Webmail button. And, voila! You will enter into your RCN Webmail account.
Logging in to RCN webmail is simple and quick. However, if you have any difficulty accessing your account, you can go through the Webmail Problems and Solutions guide.
Mail Server Settings RCN
You may have noticed that the process to rcn.com login is a bit long. You first have to go to the webmail.rcn.com page, select your city, again select the Webmail option, and so on. However, you can shorten this process and access your RCN email account in your email client like Outlook, Apple Mail, etc.
Well, for doing so, you will need RCN Webmail server settings. These are of significant use while setting up an email account in a third-party email client, as they govern the incoming and outgoing of emails and other necessary operations. Listed below are these settings for your webmail.rcn email account:
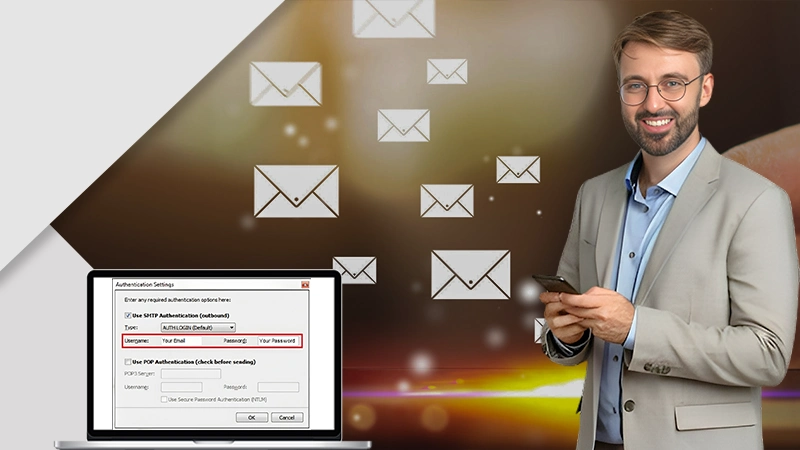
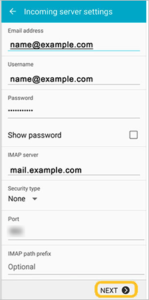
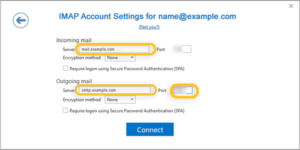
Incoming Mail Server Settings – IMAP
- Account Type: IMAP
- Server: imap.rcn.com
- Port No: 143
- SSL/TLS: NO
- Authentication Required: Yes (Your RCN email address and password)
- Username: Your RCN email address
- Password: Your RCN email account password
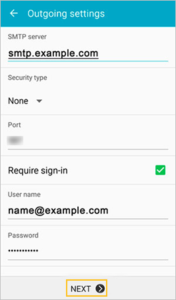
Outgoing Mail Server Settings – SMTP
- Server: smtp.rcn.com
- Port No.: 25
- SSL/TLS: No
- Authentication Required: Yes (Your RCN email address and password)
- Username: Your RCN email address
- Password: Your RCN email account password
Setting up RCN Webmail on Different Devices
As aforesaid, accessing your rcn.com Webmail will become more effortless if you have added it to your device’s email client, the email app that you normally use to access different email accounts. There’s another benefit of using third-party email clients, you can download all your emails from the webmail very easily.
So, in order to know how can you do the RCN email login on different email clients and devices, jump right onto the instructions given below:
On Android
- First off, open the Gmail app on your device.
- Tap on the profile picture present at the top right corner and select the Add Another Account option.
- Then, select the Other option from the following page.
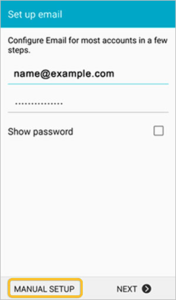
- On the next screen, enter your RCN email address in the given text field, and tap on the Manual Setup option present at the bottom.
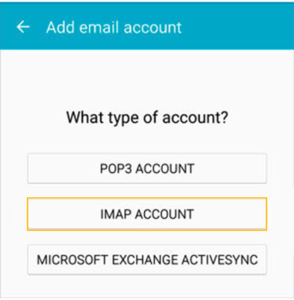
- 5. In the Account Type window, select the IMAP Account option.
- 6. After that, you will have to fill in the mail server settings for IMAP. You can refer to the above section for the same where all IMAP server settings are given. Then, tap on Next.
- 7. On the following page, fill in the SMTP server settings. Again, refer to the previous section for the same. Here, please keep in mind to check the Require Sign-In option, and then tap on Next.
8. Finally, tap on Done, and Agree to Google terms and services. With this, your RCN email login is done on Android.
These were the steps to add your RCN Webmail in Gmail on mobile phones. However, if you want to add your Webmail to Gmail on the browser, the steps to do so are different, for which you have to refer to the respective guide.
On iPhone/iPad
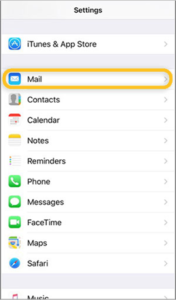
- On your Apple device, open the Settings app.
- Scroll through the Settings page, and tap on the Mail section.
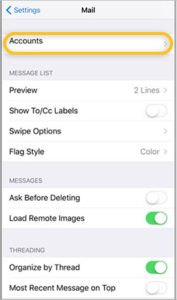
- 3. Tap on Accounts on the next page.
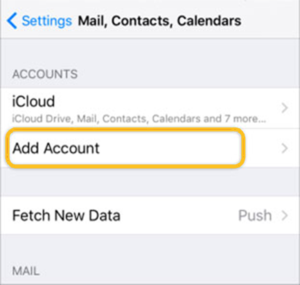
- 4. Then, select the Add Account option.
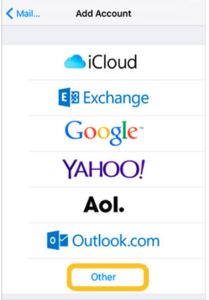
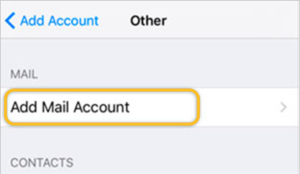
- 5. After that, you will see the email service providers list. There, tap on the Other option.
- 6. Again select the Add Mail Account option.
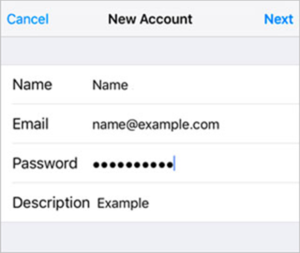
- 7. On the next page, you will have to type your name, your RCN email address and password, and the description of the mail. Then, tap on Next.
- 8. Now, Mail will check for your account’s authentication. If it’s done without any difficulty, then tap on Save and you are done. However, if the device fails to recognize the email settings, then you will be asked to enter the mail server settings manually. For this, continue to the further steps.
- 9. Switch to the IMAP tab, fill in the incoming and outgoing mail server settings (refer to the previous section for the same), and tap on Next.

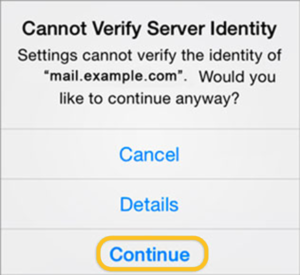
- 10. After that, you may receive a prompt stating “Cannot Verify Server Identity”. There, tap on Continue or tap on Details and then select Trust.
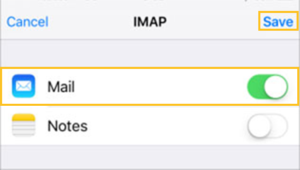
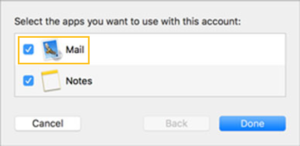
- 11. Finally, select the apps you want to sync with your RCNmail. Here, ensure that the Mail toggle button is turned on, and then tap on Save.
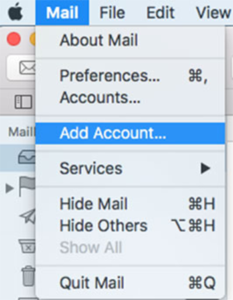
On Mac’s Apple Mail:
- Open the Apple Mail app on your Mac.
- Click on the Mail menu from the top menu ribbon, and select the Add Account option.
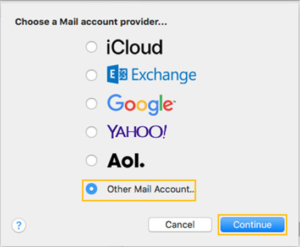
- 3. In the Choose a Mail Account Provider window, select the Other Mail Account option and click Continue.
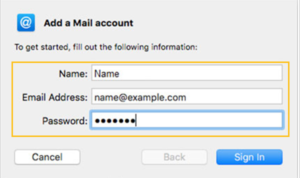
- 4. Next, you have to enter your name, RCNWebmail address, and password, and click on the Sign In button.
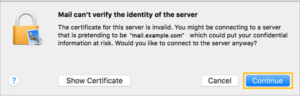
- 5. Next, Apple Mail will try to verify your email. If it is successful, then you have to select the apps you want to sync with your RCN mail and click on Done, and you will be done here. However, if the email isn’t verified, then you will have to follow the steps given further.
- 6. Now, fill in your RCN mail server settings, which you can get from the previous section. After entering all the information, again click on the Sign In button.

- 7. On the prompted window, select the Continue option.
- 8. Finally, select the apps you want to sync with your RCN email account. Here, ensure that Mail is selected, and then click on Done. With this, your RCN email will be logged into the Apple Mail.
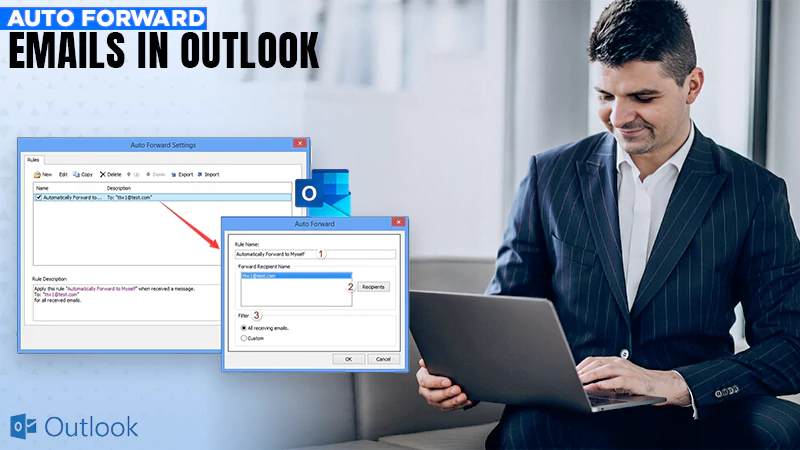
On Outlook for Windows
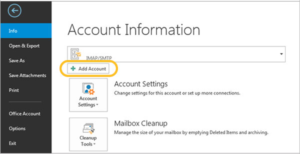
- To begin with, open the Outlook app on your system and click on the File menu option.
- On the following screen, click on the Add Account option under the Info tab.
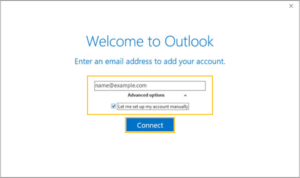
- 3. Then, enter your RCN email address in the given text field, expand Advanced Options, and select the Let Me Setup My Account Manually option. Then, click Connect.
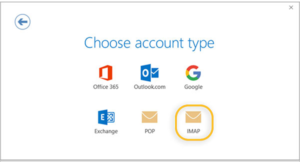
- 4. From the Account Type window, select the IMAP option.
- 5. The mail server settings window will open. It may be automatically filled with all the information, so click Next. However, if it is not pre-filled, then refer to the previous section, fill in the required info, and click Next/Connect.
- 6. Finally, enter your RCN email account password, and click Connect. Click Done, and your RCN email account will be logged into the Outlook app.
How to Change RCN Webmail Password Online?
Though RCN Webmail is secure, you need to ensure that no unauthorized user can access it, by adapting to some measures on your own end. One great measure to do so is changing your account’s password on a timely basis.
Thus, if you want to know how can you change your RCN Web Mail password, then given below are instructions to do the same:
In a MyRCN Account
- Begin by opening the browser and signing into your webmail rcn.com email account. You can refer to the above section of the article for how you can log into RCN email.
- After you are signed into your account, click on the Accounts and Password option present under the RCN Webmail on the right side of the navigation bar.
- If you have multiple email addresses linked to your RCN Webmail account, select the email address for which you want to change the password, from the drop-down list present in the Change Email Passwords section.
- Finally, you will be directed to the page where you can enter a new password. You have to enter the new password twice, and then click on the Submit button.
In Usertools
- First, you have to open the browser on your device and go to the RCN Usertools website.
- There, you have to enter the email address and password that you use to log into your RCN email account in the Username and Password fields, respectively.
- On the following screen, fill in your new password two times to confirm it, and click on the Submit button.
With this your RCN email password will be changed, however, it will take 5 minutes for the changes to be effective.
And with that said, this guide ends here. Hope it was helpful and that you were able to access your RCN Webmail account without any difficulty.
Sources:
Read More: