How to Auto Forward Emails in Outlook? Effective Methods to Manage Multiple Email Addresses
Explore how to forward emails in Outlook automatically and access all your emails in one location.
According to Statista, the majority of people have two to four email addresses. It’s because keeping various accounts allows you to keep personal, professional and business emails separate. However, the continuous need to transfer messages from one account to another is such a hassle. Hence, in these situations, you can consider email forwarding in Outlook.
Email forwarding allows you to automatically redirect incoming emails to the desired inbox. To leverage this feature, go through this write-up and learn how to auto forward emails in Outlook in the Outlook web, desktop, and mobile app.
Why Do You Need Outlook Automatic Forwarding?
Automatic forwarding Outlook allows you to keep all the conversations and messages at one designated email address. It allows you to achieve increased efficiency in email management.
The email forwarding setup process requires you to specify the source and the target, i.e., the original email address and the address where you wish to keep the message. After the setup is done, the inbox will automatically forward the messages to the intended recipients.
Note:
There are two methods for email forwarding in Outlook: manual and automatic.To manually forward an email:
Select the message you wish to forward. Click on the three dots in the toolbar. Select forward from the menu and enter the recipient’s email address. Press send, and you are done.
Let’s glimpse some benefits of automatically forwarding emails in Outlook:
- It helps you sort out work and personal emails. You can easily track the emails when required.
- You can use the forwarded emails as a backup in case you accidentally delete some messages.
- It allows you to manage multiple email accounts with increased efficiency. This eliminates the need for you to check each account continuously.
- You can keep unwanted messages out of your inbox and scroll through messages seamlessly.
Hence, auto-forwarding emails in Outlook can offer a variety of benefits.
How to Auto Forward Emails in Outlook Web?
Although Outlook Web doesn’t use traditional forwarding servers, it still allows you to forward messages using online services. It’s pretty easy to auto forward emails in Outlook.com. Follow the steps below:
- Open Outlook.com and log in.
- Click on the setting icon in the toolbar.
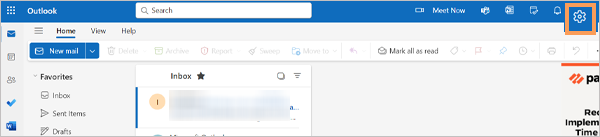
- Then click on mail from the left panel.
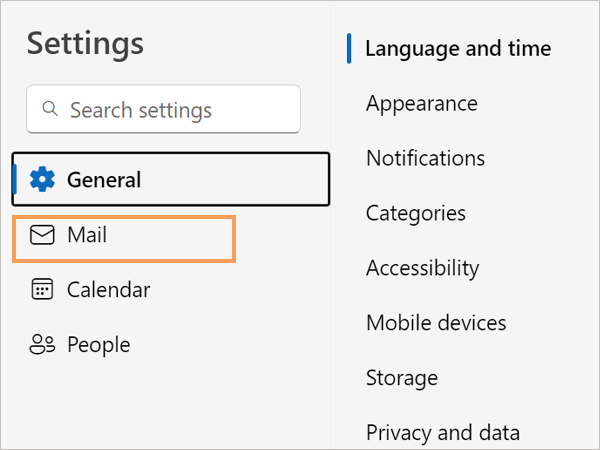
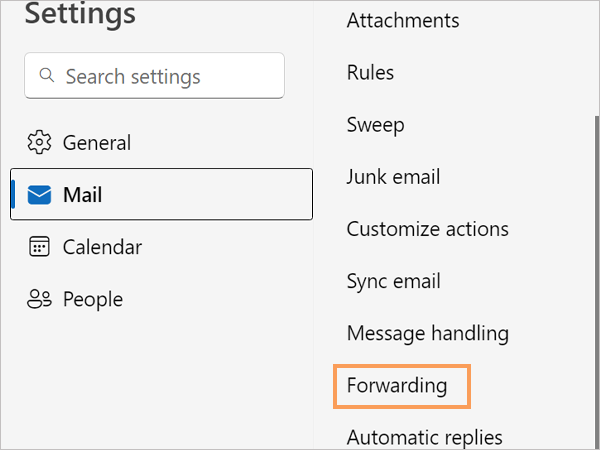
- Now, select forwarding from the bottom panel.
- Turn on the Enable forwarding toggle.
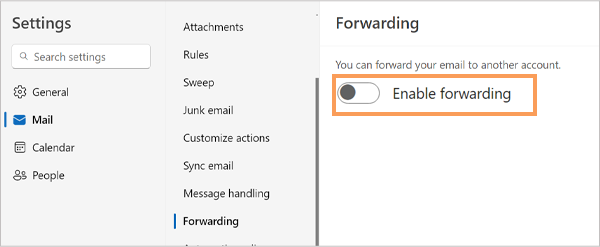
- Now, enter the email address where you want to send the messages.
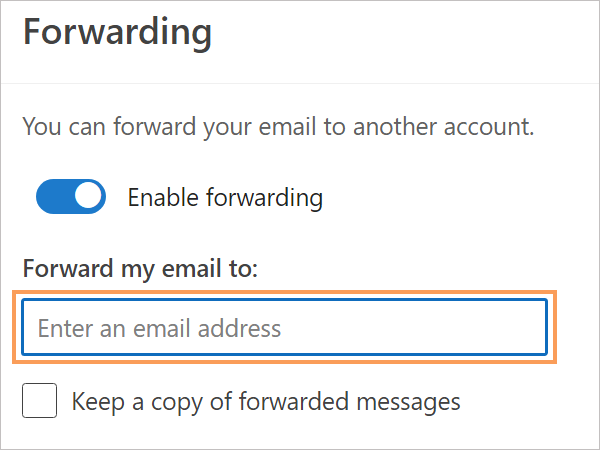
- Now, click on the checkbox below to keep a copy of the forwarded messages. This step is optional.
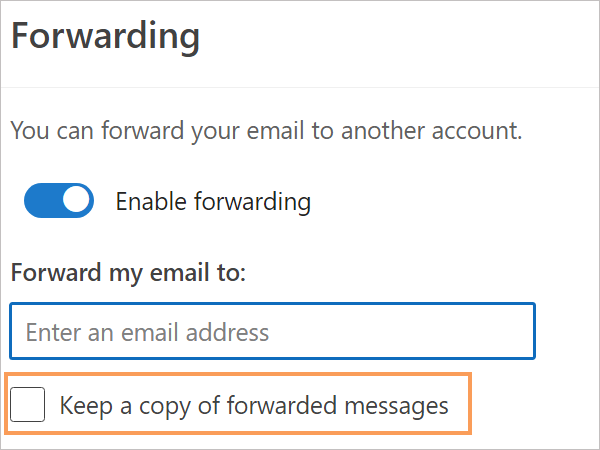
- Press save to finish the auto-forwarding set-up in Outlook.com.
Note:
You can’t forward multiple emails at once in Outlook. However, you can add them as attachments to a new single mail and send it to the recipient. Another way is to learn how to create a distribution list in Outlook.
How to Set Up Auto Forward in Outlook Desktop Client?
Outlook has released many versions until now. The suitability of these Outlook versions often depends on the device and requirements of users, whether for personal or professional use (usually managed by IT departments). However, this blog post will explore how to auto forward emails in Outlook 2013, 2016, and Outlook 365.
Note:
Microsoft support for Outlook 2013 has ended as of 11 April 2023. There will be no extended security updates and no more extensions. It will continue to function, but it may expose you to various security risks.
Since October 10, 2023, Microsoft has put an end to its mainstream support for Office 2016.
Thus, it is recommended by Microsoft to upgrade Office to a newer version. For more information, visit Microsoft Support.
For Outlook 2013 and 2016
The steps to set up auto-forwarding emails in Outlook 2013 and Outlook 2016 are pretty identical. Hence, in this post, we will use Outlook 2013, and you can follow the same steps in the 2016 version.
Here’s how to automatically forward emails Outlook Desktop 2013 and 2016 versions:
- Launch the desktop Outlook.
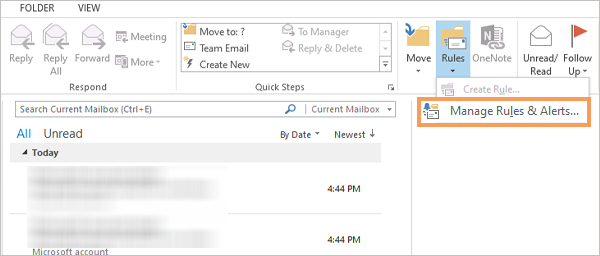
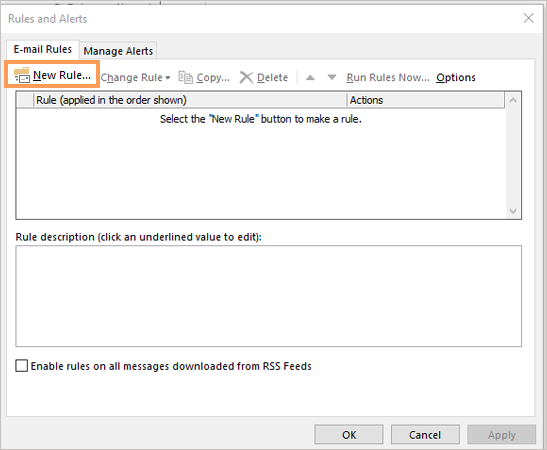
- Head to the home tab. Now, click on Rules from the Move section in the toolbar.
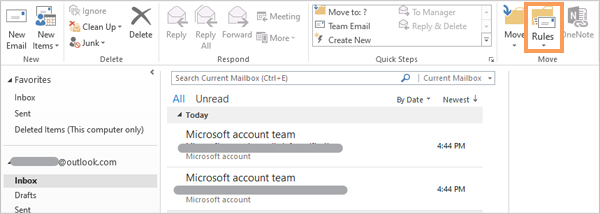
- Choose Manage Rules & Alerts from the menu.
- Select the New Rule tab from the menu.
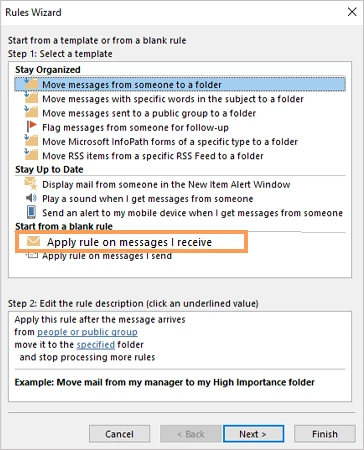
- Now, you will see a Rule Wizard tab.
- Next, select Apply Rule on Messages I receive from the Start from a Blank Rule menu.
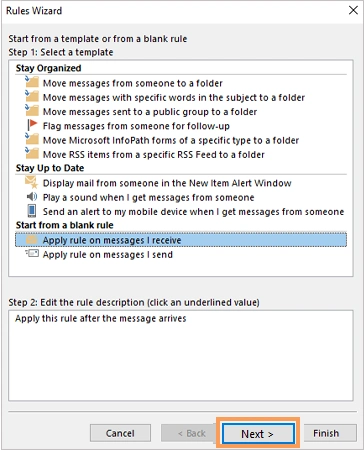
- Then, click on Next.
- Select from people or public groups.
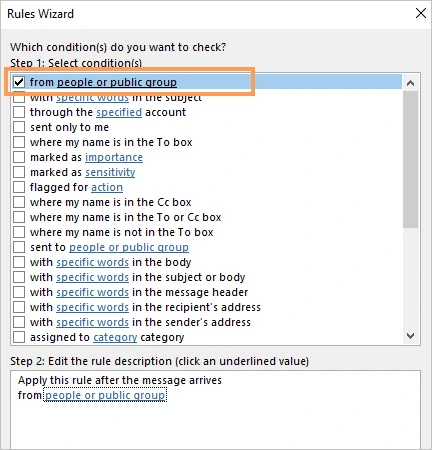
- From the step 2 box, click on the people or public group link.

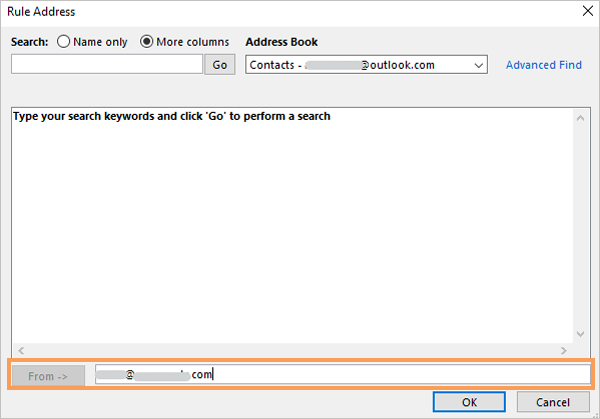
- Now, enter the email address of the source in the From section. Then, press OK.
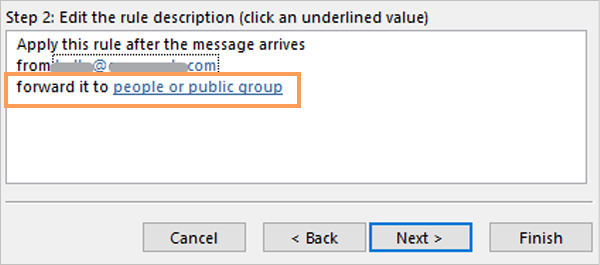
- After editing the rule description, press next.
- Now, from the next tab, select Forward it to People or Public Group.
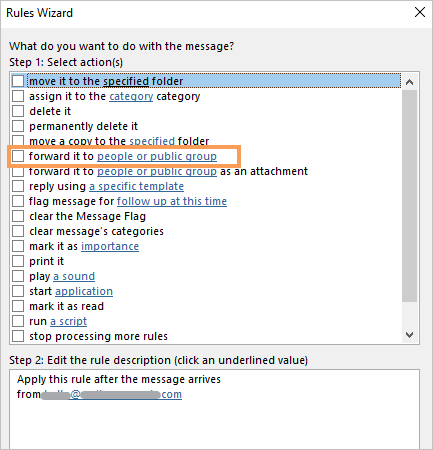
- Now, click on the people or public group link in the step 2 box.
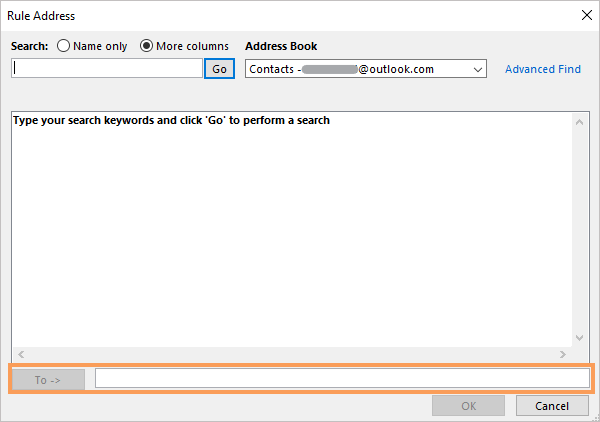
- Enter an email address in the To section. Then, press OK.
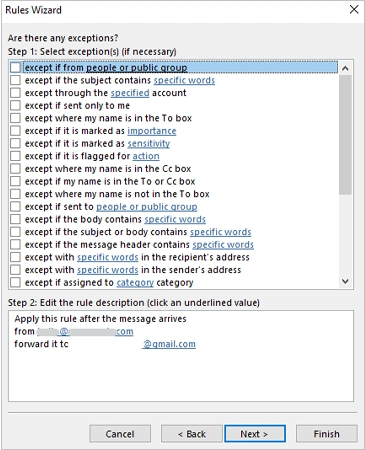
- In the next tab, you can choose the exception cases according to your requirements. Then press next.
- Now, name the forwarding rule.
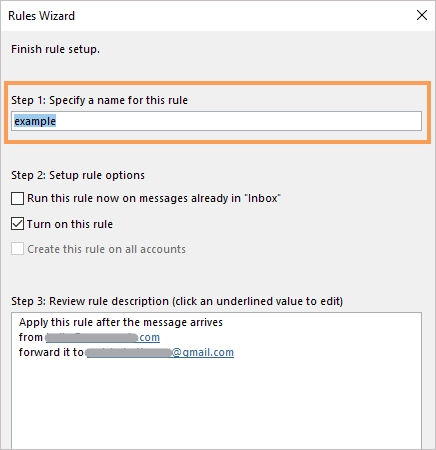
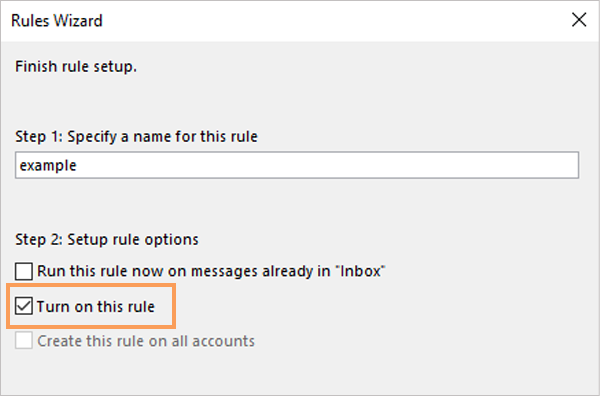
- Next, select the turn on this rule.
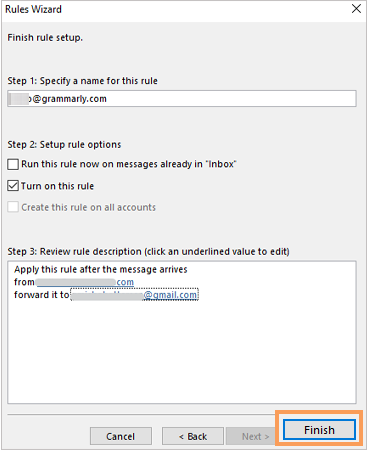
- Press finish and your forwarding email setup is all done.
Now, let us look at how to auto forward emails in Outlook 365.
For Outlook 365
Microsoft 365 is widely known as the product family that offers productivity software and cloud-based services. It is a new version of Office that offers subscription-based services, and Outlook 365 is one of them.
The interface and functionality of the Outlook cloud-based service resemble the functioning of Outlook.com. Hence, the ways to set up automatic forwarding are also more or less similar.
To set up automatic forwarding in Outlook 365: Go to settings >> Mail >> Forwarding. Now, enable forwarding and enter the email address where the emails will be forwarded. Next, choose whether you wish to keep a copy of the future emails or not. Boom, you are done now!
Another way to auto-forward emails is to run rules in Outlook 365. For that, you can follow the same process as mentioned in the preceding section.
Also read: How to Change Password on Outlook App – Mobile & PC (2023)
How to Auto-Forward Emails in the Outlook App?
During our research, we found out that the Outlook mobile app doesn’t have any direct methods to set up automatic forwarding. However, there are two alternate methods to get access to the basic needs of email forwarding.
- The first method is to access Outlook in the web browser on your device. Then use the same steps as mentioned for the web.
- The other method is to select the messages individually and forward them from the app.
Let’s take a look at how to forward Outlook emails to another email, selecting the messages individually, follow the steps mentioned below:
- Open the Outlook app on your mobile device.

- Open the message you wish to forward.
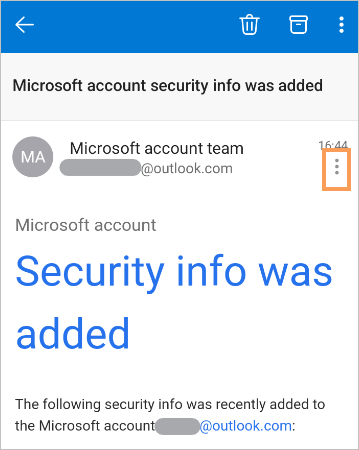
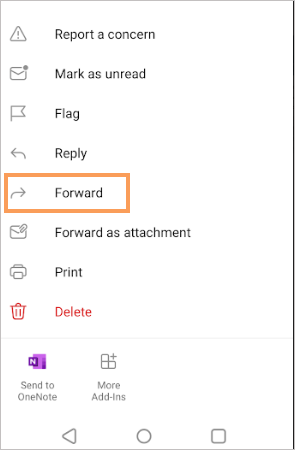
- Now, click on the three dots beside the sender’s name.
- From the tab, choose forward.
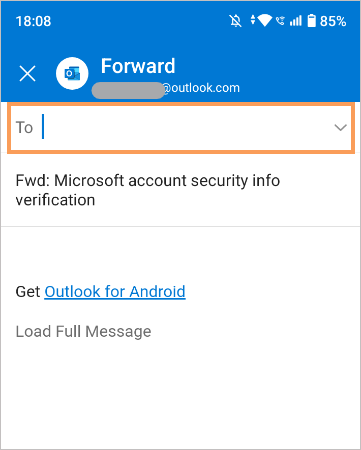
- Now, enter the email address where you wish to send the message.
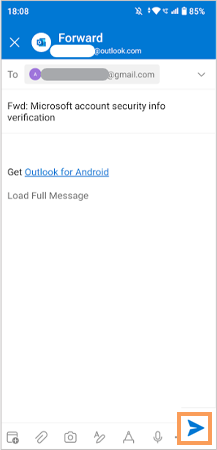
- Click on the send icon, and you are done.
Note:
On an iPhone, the steps to forward the message separately are almost identical to the ones mentioned in the above section.
Conclusion
Automatic email forwarding in Outlook allows you to create forwarding rules and integrate multiple email addresses into one mailbox. You can save significant time and effort by auto forwarding Outlook emails. Hence, follow the steps mentioned above to foster more simple and secure communication in Outlook.
Additionally, you can hire professional email forwarding services to efficiently manage the merged mailbox.
Read Next: How to Block an Email on Outlook Using Web, Desktop Client, and Mobile App?
FAQs
Ans: To set up auto-forwarding in Outlook, open the Outlook web and log in. Now, click on the settings icon at the top of the page. Next, click on Mail >> Forwarding. Enable forwarding and enter the email address where you want to forward the message.
Ans: Unfortunately, there is no such feature to directly set up the auto-forwarding emails in the mobile app. However, you can access Outlook.com from the web or individually select the message and forward it.
Ans: No, forwarding several emails at once is not possible in Outlook, both on the desktop and on the web. However, you can send the messages as attachments to a new email.
Ans: No, it is not possible to directly forward a folder of emails in Outlook. However, you can select all the emails and add them as attachments to a new email. Although it won’t be delivered as separate messages, it will serve the purpose.
Ans: To forward the emails in Outlook to Gmail, you can create a rule in the desktop Outlook app. To create the rule:
- Go to the home tab. Now, from the Move menu, select Rules >> Manage Rules & Alerts >> New Rule.
- Select the from people or public group and enter the particular email address that should be the source.
- Next, select forward it to people or public group and enter the email address where you wish to forward it.
- You can also create an exception in the next section.
- Now, name the rule, turn on the rule, and press finish.
Source Links