How to Access Your iPrimus Webmail Account?
iPrimus is a telecommunication company in Australia that provides Internet, mobile, and cable TV services and has been connecting the country for over 25 years. As a perk for users who take services from this telecom giant, it provides its customers with an iPrimus Webmail account.
iPrimus Webmail Australia is a decent email service that provides you with features that most of the mainstream services, like Gmail, Cox Webmail, offer to their users.
Well, if you are an iPrimus customer and want to know how you do the iprimus.com.au webmail login, this is the right place to be. The following article will walk you through webmail’s login process, how you can access it through other email clients, like Outlook and Windows Mail, what mail server settings are necessary for mail setup, and much more.
Steps for iPrimus Webmail Login
In order to do the iPrimus.com.au webmail login, you just need to follow the same simple steps as with any other webmail, like Bigpond Webmail. Just open the browser, visit the correct webmail page (as there can be fraudulent web pages for the same), and log in by filling in your correct credentials.
Here’s how you can do the Webmail iPrimus login email:
- First off, launch the browser on your device and go to www iprimus com au webmail – iPrimus Webmail login page.
- Once you are on the required webpage, you will see the iPrimus Webmail log in form. There, in the first field, enter your iPrimus Webmail address.
- In the next text field, enter your email account’s password.
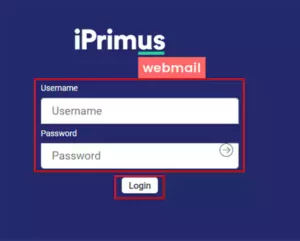
- Finally, click on the Login button to enter your account.
And with just these four steps, you will enter your Webmail iprimus.com.au account.
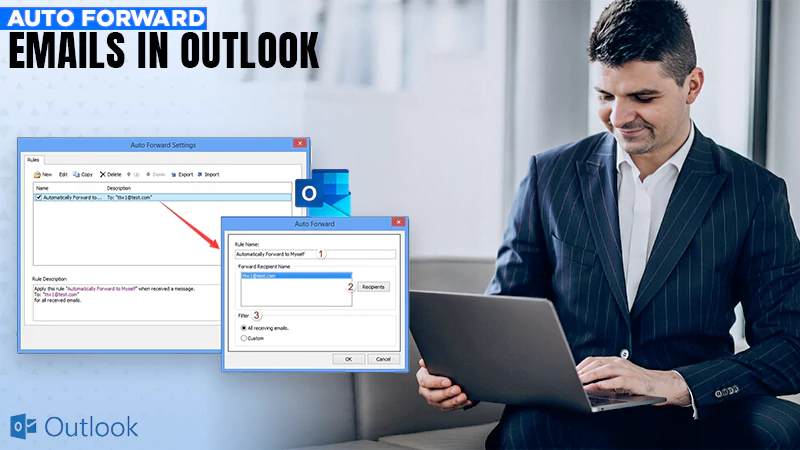
How to Set up iPrimus Email in Outlook?
Setting up your iPrimus Webmail Australia in an email client like Outlook makes it easier for you to access your email. Further, Outlook will automatically download all your emails from the Webmail server to your system, and therefore, you won’t have to worry about running out of your webmail storage or their deletion after 90 days.
So, to know how to set up your Webmail iPrimus on Outlook, follow these steps:
- Open the Outlook app on your system.
- Once the app opens, click on the Tools option from the top menu bar. This will open a small menu, where you have to click on the Account option.
- Next, the Internet Accounts dialog box opens up on your screen. There, click on the Add button and click on Mail.
- After that, enter your name in the field displayed on the screen and click Next.
- Enter the email address you received from iPrimus. It must have a ‘@primusonline.com.au’ domain name. And, Click Next.
- On the following window, you have to fill in the information given below:
- Incoming Mail Server: pop.iprimus.com.au
- Outgoing Mail Server: smtp.iprimus.com.au
- Username: The first part of your iPrimus email address
- Password: Your iPrimus Webmail account password
Note: If you require more information, look into the iPrimus Webmail Server Settings section of this write-up.
- After you have filled in the above information, click Next and then Finish to end the iPrimus Webmail setup process on your Outlook.
Once you have completed the setup, close the Outlook app and open it again. Click on the Tools menu and select Account to open the Internet Account dialog box. This time, you will find your iPrimus Webmail listed there. You can select your email from there to access your account.
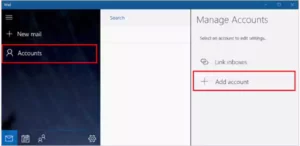
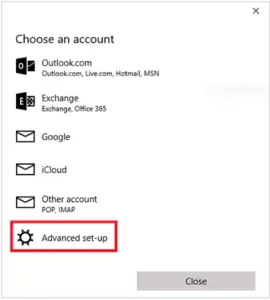
Adding iPrimus Webmail to Windows Mail
Just like you can add and access your Webmail Primus account to Outlook, you can do the same in Windows Mail. Jotted down are the steps that will guide you through the process:
- Begin by launching the Windows Mail app on your computer.
- Then, click on the Account option from the left sidebar of the screen, and then select the Add Account option.
- After that, you have to click on the Advanced Setup option.
- Next, select the Internet Email option.
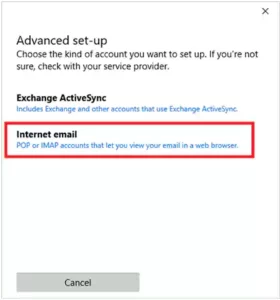
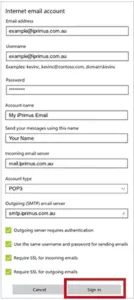
- On the following screen, you have to fill in the following information:
-
- Email Address: Your iPrimus email address
- Username: It will also be your iPrimus email address
- Password: Your account password.
- Account Name: The name you want to give to your email account.
- Send your Message Using This Name: Your name that will be displayed on all Outgoing emails.
- Incoming Mail Server: pop.iprimus.com.au
- Account Type: POP3
- Outgoing (SMTP) Email Server: smtp.iprimus.com.au
-
- Once you have filled in all the required info ensure that all the options below the above fields are selected.
- Finally, when everything is done, click on the Sign In option at the bottom of the window.
Receive Your Bills on Your iPrimus Webmail Account
Despite its limited capabilities, iPrimus Webmail can be highly useful for receiving your bills via email. This helps you get early access to your bills and allows you to pay them through various online methods.
So, if you want to receive your bills on your iPrimus email account, here’s how you can do this:
- First, open your iPrimus account.
- Then, select your Client Type: Residential or Business.
- Then, you will be required to fill in some of your customer’s details as follows:
-
- iPrimus Customer Number
- Date of Birth of Account Holder
- Email Address to Send Bills to
- Confirm Email Address
-
- After you have provided the required information, click on the Submit button, and you are done.
iPrimus Webmail Server Settings
iPrimus recommends configuring your mail client, like Outlook or Windows Mail, to use POP and to delete emails from the mail server once retrieved. By retaining a duplicate of emails on the iPrimus mail server, you can avoid exceeding your mailbox storage limit.
So, here are the settings that you may require during your account setup:
Incoming Mail Server – POP3:
- Incoming Server Name: pop.iprimus.com.au
- Port Number: 110
- SSL Required: No
- Username: The first part of your iPrimus email address
- Password: Your iPrimus email account password
- SPA (Secure Password Authentication): Disabled
- Leave a copy of messages on the server: Disabled
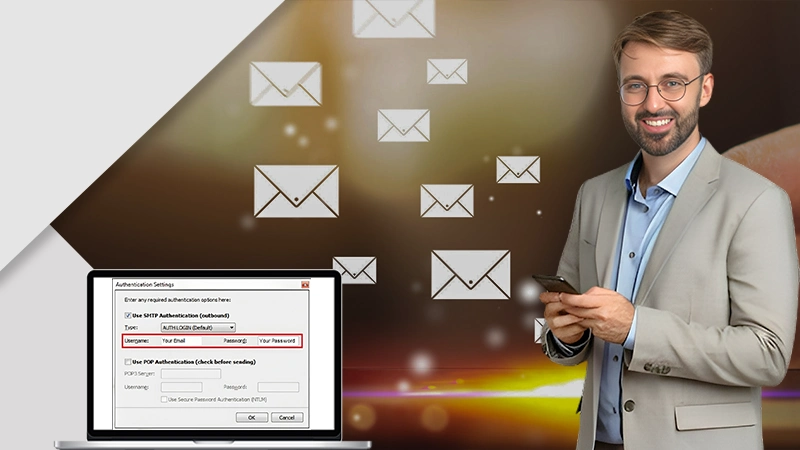
Outgoing Mail Server – SMTP:
- Outgoing Server Name: smtp.iprimus.com.au
- Port Number: 25
- Encryption/Security: No
- Username: The first part of your iPrimus email address
- Password: Your iPrimus email account password
- SPA (Secure Password Authentication): Disabled
- Leave a copy of messages on the server: Disabled
iPrimus Webmail Storage Capacity
iPrimus Web Mail might provide you with a handful of useful features; however, the storage capacity it provides isn’t one of them. Your webmail account has only 100 MB of storage capacity. If it is filled, you are required to remove stuff and emails from your webmail in order to send and receive new emails.
Further, you also need to keep in mind that emails that are older than 90 days can also be removed automatically from the iPrimus com au webmail servers without any prior notice to you.
However, in order to increase capacity and preserve copies of your emails for a longer period of time, you can set up your iPrimus Webmail in email clients such as Microsoft Outlook or Windows Mail.
Now, to know how you can do this, keep reading the article further.
What Happens When Your iPrimus Mailbox is Full?
As you know, iPrimus Webmail only provides 100 MB of storage in your Mailbox. So, it is very likely that you will run out of space very easily and very quickly. But the question here is, Why does it matter if your storage is full?
Well, once your iPrimus Webmail storage reaches its maximum capacity, you won’t be able to send or receive new emails.
Now, you ask, What can you do in this situation to start receiving and sending emails? As you have guessed, you will have to delete your previous emails to make room for more. And here’s how you can do this:
First off, you need to determine your current mailbox capacity. In order to know this, look for the gear symbol in the lower-left corner of your mailbox. There, you will see how much storage you have occupied. After that, just go to your inbox, and start deleting your emails that are not important.
To save some time and space, you can set your email account to delete any messages in your Trash automatically, after the logout. If you like the idea, given below are the steps for the same:
- To begin with, navigate to Settings in the upper right-hand corner of your mailbox, and click on it.
- From the menu that opens, select the Preferences option.
- After that, select Server Settings.
- Finally, turn on the toggle button for the Clear Trash on Logout option under Maintenance.
Why You Cannot Send or Receive Emails?
If you are unable to send or receive emails through your www.iprimus.com.au/webmail account, then there are two reasons for the same, which are given further:
- Your inbox is overflowing: As also mentioned earlier, iPrimus Webmail only provides 100 MB of storage. And, if you have run out of space in your Mailbox, then you won’t receive any new emails and won’t be able to send any as well. In order to overcome this difficulty, you have to delete some previous emails.
- Your email configuration is wrong: While setting up your email account in third-party email clients like Outlook or Windows Mail, if you have incorrectly filled in any of the server settings information, you will face issues sending or receiving emails. To resolve this issue, access your email client’s mail server settings for your iPrimus account, and match them with the ones given in the “iPrimus Webmail Server Settings” section above.
In case you are facing any other issue than these, you can refer to the dedicated guide for Webmail problems and solutions.
How to Reset Your Forgotten iPrimus Username or Password?
If you have forgotten your Account Toolbox username and password, then here’s how you can reset it:
- First off, open the browser and go to this page to reset iPrimus Username and Password.
- Upon reaching there, you have to select one of the following options in the Verification Method: Customer Number, Service Number, Contact Mobile Number, or Contact Email.
- Then, in the following field, provide whatever information you have selected above.
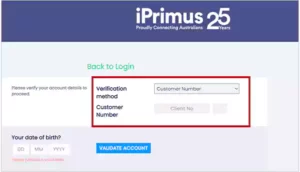
- After that, fill in your date of birth in the next given area.
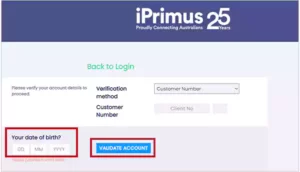
- Finally, click on the Validate Account button, and verify your identity using your email address or mobile number that is linked to your iPrimus account.
With this, this iPrimus Webmail guide ends here. I hope this was helpful and that you can easily access your webmail.
Sources
Read More :