Hostinger Webmail Login | Easy Method To Access In All Devices
Hostinger is a well-known web hosting company that provides a variety of hosting services, such as cloud hosting, shared hosting, VPS hosting, and more. It offers low-cost hosting solutions to people and organizations all around the world. While Hostinger’s primary focus is providing web hosting, the company also offers Hostinger Webmail services to its customers.
So, if you are a Hostinger customer, you can have your own custom email account that you can access through the Hostinger Mail client. Not only that, you can even set it up on your preferred webmail clients like Outlook, Thunderbird, Apple Mail, etc.
So, if you want to know how to create an email using Hostinger and how to do the Hostinger Webmail login, go through the following write-up.
Creating a New Hostinger Email Account
Before we dive into the process of knowing how to access the Hostinger Webmail, let’s have a look at how we can create an account on mail.hostinger. Well, the steps below tell you just to do that:
- First off, you need to do the Hostinger login. So, open the browser on your device, and log into your Hostinger hPanel.
- Then, in your hPanel, hop into the Emails section.
- Now, you will see a list of all the domains you bought from Hostinger. Select the domain for which you want to create the Hostiner email account.
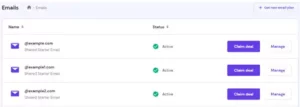
- On the following page, click on the Create Email Account button.
- Next, you have to create your custom email address with the chosen domain and then create your password for the email account in the Email Name and Enter New Password fields, respectively.
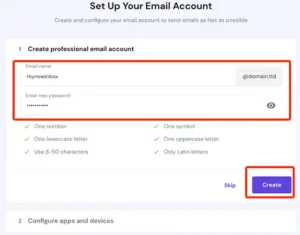
- Once done, click on the Create button, and you now have your WebmailHostinger account.
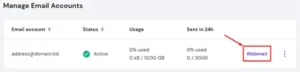
You can find your newly created Hostinger email address under the Manage Email Accounts section of your hPanel.
3 Ways to Access your Hostinger Webmail
After you have created your Hostinger Mail account, there are three ways that you can use to access your account. So, in order to know what are the different ways to do the Hostinger Webmail login, hop into the section further:
Using Email Client:
These days, there are a lot of email clients that you can use to add your email account for easy access from any location without any hassle. Some of the most widely used are Outlook, Apple Mail, Thunderbird, etc.
So, if you are looking to do the HostingerLogin, you can use any of these apps to add your account and access it whenever you want with just a single click.
To know more about how you can add your Hostinger Webmail to different email clients, jump to the next section.
Using Hostinger Webmail:
Though you can easily access your Hostinger email account using third-party clients, there’s always the option to use mail.hostinger login page itself.
Well, to do the Hostinger Webmail login, you just have to visit the Hostinger Webmail page, fill in your credentials (that you created in the first section of this article), and hit the Sign in button.
You may bookmark the following URL in your computer or mobile browser to easily access your email at any time.
Using Hostinger hPanel:
Another way to log into your Webmail Hostinger is through hPanel. The steps for the same are given below:
- On your browser, open the Hostinger Account log-in page.
- Fill in your Hostinger account credentials and sign into your account.
- Then, click on the Email Accounts section.
- Scroll down on the following page, go to the Manage Email Account section, and click on Webmail.
- Finally, you will be directed to the email client, where you can access your Hostinger Web mail.
Accessing Hostinger Webmail through Third-Party Email Clients
As mentioned earlier, using third-party email clients makes it easier to do the Hostinger login. By doing so, you will be able to check your account for new emails by just opening the app with one simple click, without having to go through the login process over and over.
Listed further are some popular email clients and the process to set up your mail.hostinger account on them:
Note: Before moving on to the process of accessing your Hostinger email account in third-party email clients, you should know the difference between IMAP Vs POP3. This will help in setting up your account more appropriately. Also, know beforehand that, while setting up an account in different email clients, IMAP is preferred over POP.
Thunderbird
Windows:
- On your device, launch the Thunderbird app.
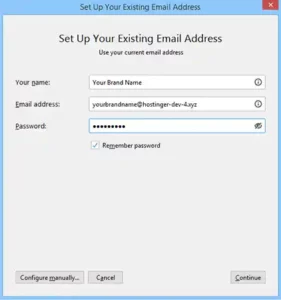
- If you have downloaded the app for the first time, then you will see the Set Up window pop-up on your screen. There, enter your name, the Hostinger email address you created, and your password. You have to check the Remember Password option and click on Continue.
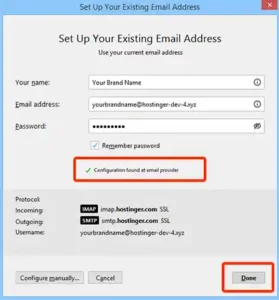
- Thunderbird will now attempt to obtain email settings from the server. If you are successful, you will see the message “Configuration found at email provider.” Click the Done button.
- The program will now ask you to select your preferred email account. If you want to make your Hostinger Webmail the default, choose Set as Default.
Mac:
- In order to do the Hostinger login on your Mac, open the Thunderbird app.
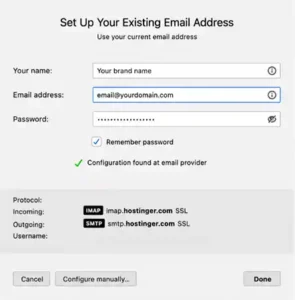
- If you have installed the app for the first time, you will see the email setup window. In that window, you have to enter your name, Hostinger Web mail email address, and password.
- Then, click on the Remember My Password option, and click on Continue.
- If the connection was successful, the message “Configuration found at email provider” will be shown. To proceed, click Done.
- You will be asked to select Thunderbird as your default email account. If you want to do precisely that, select the Set as Default option.
Note: If you can’t connect, you may try manually entering the information by choosing the Configure Manually option. You will have to fill in the mail server settings information that you can find under the Email Accounts section of your Hostinger hPanel.
Outlook
Windows:
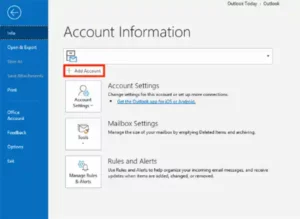
- Launch the Outlook app on your Windows, and click on the File tab.
- Then, click on the Add Account button under the Info tab.
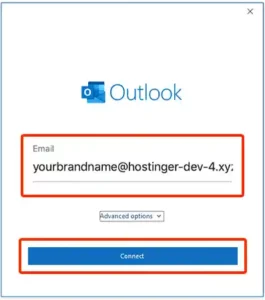
- On the following screen, you have to enter your Hostinger email address and click on the Connect button.
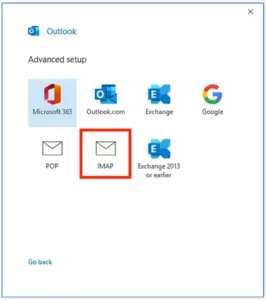
- Next, the Advanced Setup window will appear. There, you have to select the Account Type; click on IMAP.
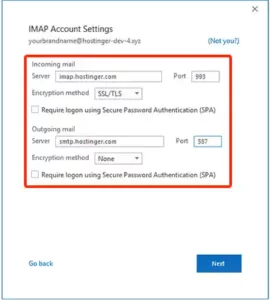
- After that, you have to fill in your mail server settings: Incoming and Outgoing Server Settings. You can find your Hostinger Web mail server settings in the Email Accounts section of your Hostinfer hPanel. After filling in the information, click on Next.
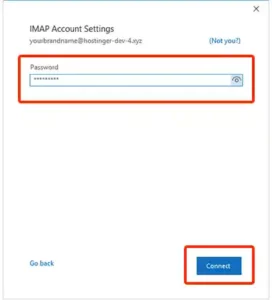
- Fill in your webmail password in the next window and click on Connect.
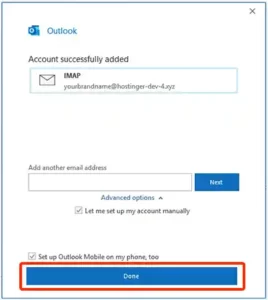
- After a few seconds, Outlook will display the “Account successfully added” message. You may exit the window by clicking Done, and your Hostinger Webmail account will be added to Outlook. You can also add another email address if you want. The steps to open another mailbox in a webmail client will be almost the same.
Mac:
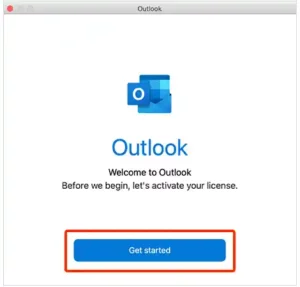
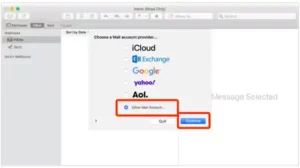
- Launch the Outlook app, and click on the Get Started button.
- If you have any email accounts linked to your account, Outlook will discover them automatically. If this is the case, select Add Others instead. If you don’t, you will be sent to the “Set Up Your Email” window.
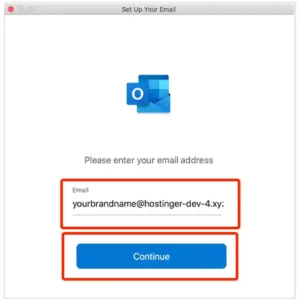
- On the next screen, fill in your Hostinger email address and click on the Continue button.
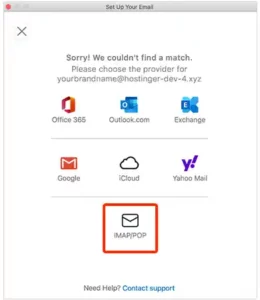
- If Outlook does not discover the email provider automatically, in the next window, select IMAP/POP.
- On the following screen, you have to select the Type as IMAP (you can also choose POP, but IMAP is preferred). Then, enter your mail server settings which you can find in the Email Accounts section of your Hostinger hPanel.
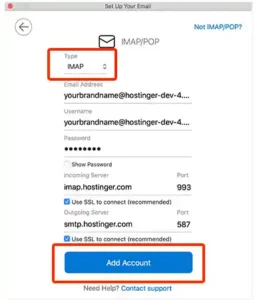
- After you have filled in the required info, click on the Add Account button.
- Finally, click Done and your account will be added.
Apple Mail
- Open the Mail app on your Mac.
- Click on the Mail menu option from the top toolbar, and then, click on the Add Account option.
- Then, select the Other Mail Account option and click on Continue.
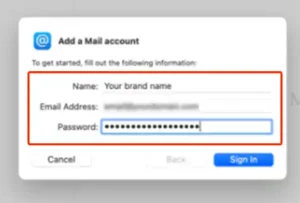
- After that, you have to fill in your Name, Hostinger Mail address, and password. Then, click on Sign In.
- If the app does not automatically authenticate your account, you can adjust the settings manually. Select IMAP as the Account Type, and type in the mail server settings, which you can find in the Email Accounts section of your Hostinger hPanel.
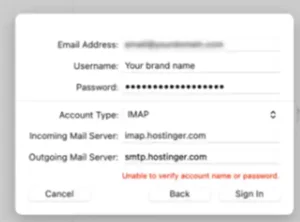
- Finally, click on the Sign in button, and you will enter your account.
Accessing Hostinger Mail on Your Phone
Just like you can access Hostinger Webmail on your Windows and Mac, you can also learn how to set up a webmail account on your phone. Given further are the steps for adding your Hostinger email account to your mobile phone:
iOS:
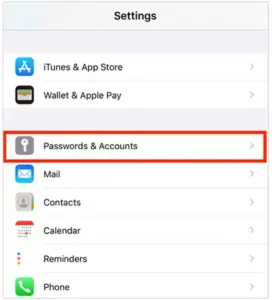
- On your iOS device, open the Settings app.
- Scroll down in Settings and tap on the Passwords & Accounts option.
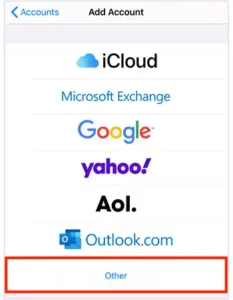
- Then, select the Add Account option present at the bottom of the following page.
- Select Other on the Add Account page.
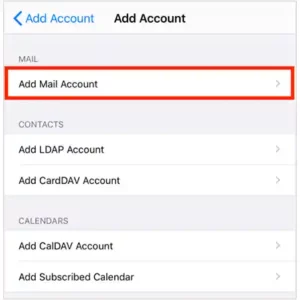
- Again, tap on the Add Mail Account option on the next page.
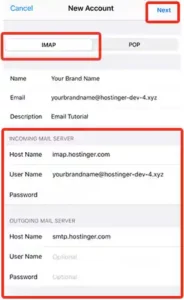
- After that, select IMAP and fill in your email server settings, which you can find in the Email Accounts section of your Hostinger hPanel. Then, tap Next.
- Finally, turn on the Mail and other apps toggle button that you want to link with your Hostinger Mail, and then tap Save.
Android:
Note: While the steps provided further may alter based on the mobile phone you use, the general process of setting up your email on an Android should be identical regardless of the device.
- Launch the Gmail app on your device, and tap on your profile picture at the top.
- Select the Add Another Account option.
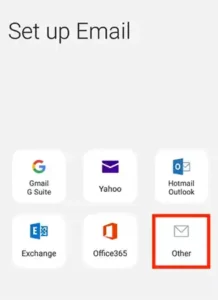
- Then, select Other from the options of email service providers.
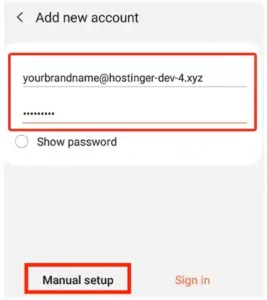
- Then, enter your Hostinger Webmail address, and tap Next.
- Enter your account’s password and tap on the Manual Setup option.
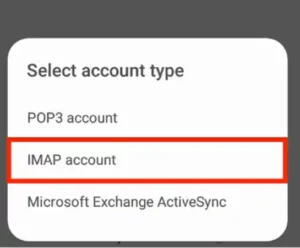
- After that, select IMAP Account as the Account Type.
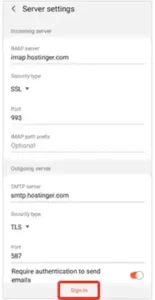
- Next, fill in your mail server settings that you can find in the Email Accounts section in your Hostinger hPanel. Then, tap on Sign in.
- Finally, select the Account Options, Agree to Google’s terms of use, and you are ready to use your mail.hostinger email account in your Gmail.
With this, the guide to Hostinger Webmail ends here! Hope you are now easily able to sign into your account.
Sources:
Read More: