How to Log into Bell Aliant Webmail? All You Need to Know About It.
Just like Optimum Webmail, Bell Aliant Webmail is an online mailing service offered by Bell Aliant Inc., a telecommunications firm based in the eastern region of Canada.
This company’s email service is highly rated by its users due to a variety of features, such as the ability to access your email from anywhere at any time, four free email addresses for you and your family members, spam detection, phishing protection, and more.
Recently, they have upped their game a notch and introduced several updated features, which are as follows: A better user interface design, a simple floating toolbar for convenient access to features, a clever method of sorting and categorizing to keep your inbox tidy, and a mobile experience that is optimized and supported by even more browsers.
Thus, if you are excited to avail yourself of access to your Bell Aliant Webmail account or want to know how to register for it or log into it, you have landed in the right place. In the following write-up, you will likely get answers to most of your questions related to Bell Aliant Webmail. So, without further ado, jump right into the sea of information below:
Registering for Bell Aliant Email Account
To access your Bell Aliant email account, you first have to register for one. To do so, you will need to have taken a service from Bell Aliant. Once you have that, you can follow the steps given below to register for Classic Bell Aliant Webmail:
-
- Open the browser on your device and go to the My Account page.
- There, click on the Register Now button.
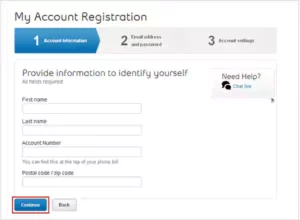
- Next, the My Account Registration screen will appear. There, in the Account Information section, fill in the following information, and then click on the Continue button:
-
-
- Your First Name
- Your Last Name
- Your Bell Aliant Account Number
- The Postal Code/ Zip Code of the area where the Bell Aliant service is currently installed.
-
-
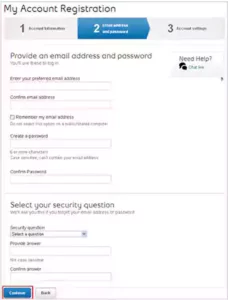
- In the next section, Email Address and Password, you have to create your Bell Alian email login credentials:
- Enter your preferred email address and confirm the same in the subsequent field.
- Create your password and enter the same in the next field.
- Select a Security Question.
- Answer the Security Question, and confirm the same by entering it in the next field.
- Click on the Continue button.
- After that, the Set Up Billing Preference screen will appear. Select one of the following options in the given screen and then click on Submit:
- Paperless billing allows you to get a monthly email notification when your bill is ready for viewing.
- Send me a payment reminder to receive an email reminder one week before your bill is due.
- Paper bill to get a monthly paper bill mailed to your mailing address
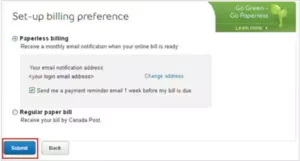
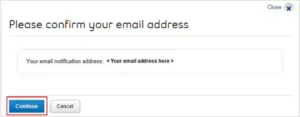
Note: If you choose Paperless billing, Bell Aliant will also send you an email to check that you are using the proper email address. To authenticate your paperless billing email address, open this email and click Confirm.
- Next, you will see the screen to confirm your email address. There, click on the Continue button.
- Again, click on the Continue button on the following page to complete the My Account setup button.
Note: The My Account – Account overview screen comes once you click Continue. You will be able to access your account and bill data here, as well as manage your services online.
Bell Aliant Email Login Steps
Now that you know how you can register for Bell Aliant email, it is time to learn how to login to Aliant Webmail.
The steps for doing so are given below:
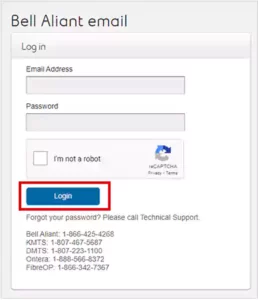
- First off, open the browser on your desktop and go to the Bell Aliant Webmail login page.
- Once you have reached the Bell Aliant email login page, you have to fill in your email address in the first field visible on the screen.

- In the next field, you have to enter the password of your Bell Aliant email account.

- Then, check the box of the I’m Not a Robot captcha.
- Finally, click on the Login button to enter your webmail account. Voila! With this, you will be able to access your account.
As you can see, logging in to your Bell Aliant webmail account is simple and won’t take much of your time. If you have any problems the next time you try to access your email account, you can move on to the “What to do if you Couldn’t Sign into your Bell Aliant Email?” section of this article or refer to the general Webmail Problems and Solutions guide.
Set up the Bell Aliant Email Account on Different Devices
It might look like a headache to you to open the browser, go to the Bell Aliant login Webmail page, fill in your credentials, and then log in. It is quite a lengthy and time-consuming process. But, you can reduce this time, and access your webmail with a single click.
You can do so by configuring your BellAliant Webmail on your email client like Outlook or Apple Mail, the instructions for which are stated below:
On iPhone/iPad:
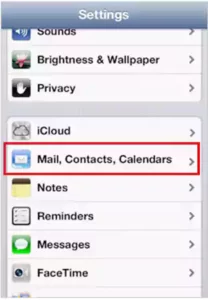
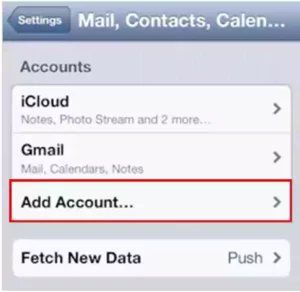
- On your Apple device, open the Settings app.
- In the Settings app, select the Mail, Contacts, and Calendars section.
- Next, tap on the Add Mail Account option on the following page.

- After that, you will see the email service providers list, there, tap on the Other option.
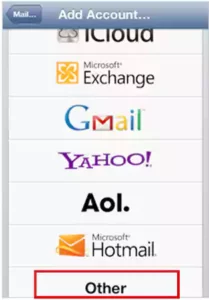
- Again, tap on the Add Account option on the next page.
- On the following page, you will have to enter the following information and tap on the Next button:
- Name
- Email Address
- Password
- Description

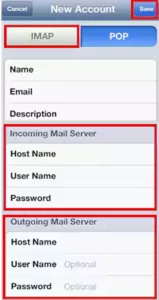
- Next, you will see the mail server settings page, where you have to select IMAP and fill in the information stated below:
-
- Incoming Mail Server:
- Host Name: imap.bellalain.net
- User Name: Enter your Bell Aliant email address, eg: henrycavill@bellalaint.net
- Password: Your email account password
- Outgoing Mail Server:
-
- Host Name: smtpa.bellaliant.net
- User Name: Enter your Bell Aliant email address, eg: henrycavill@bellalaint.net
- Password: Your email account password
-
- Incoming Mail Server:
-
- Once you have filled in all the information, tap on the Save button. Then, the email app will verify the filled-in information.
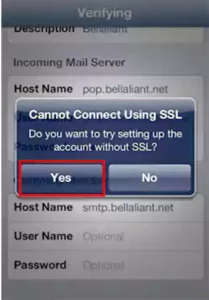
- You may see a message stating, “Cannot connect using SSL. Do you want to try setting up your account without SSL?”. There, tap Yes.
- Once that’s done, select the apps to sync with your Bell Aliant email account. There, don’t forget to tap on the Mail app and then tap on the Save button.
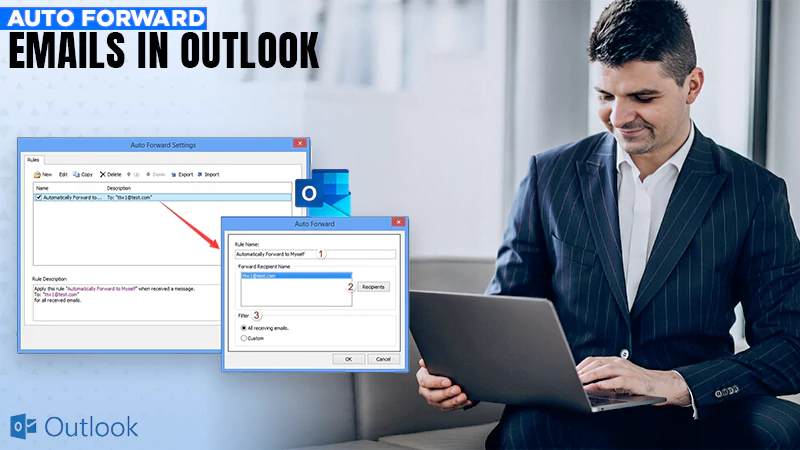
On Microsoft Outlook:
- First, open the Outlook app on your system, and click on the Next button on its startup window. If you already have an account in Outlook, click on the File menu, select Add Account option, then click Yes, and Next.
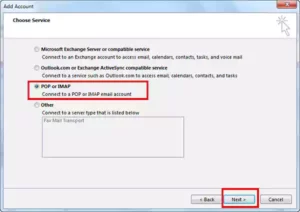
- After that, the Add Account window will open. There, select the Manual Setup or Additional Server Types option, and click on Next.
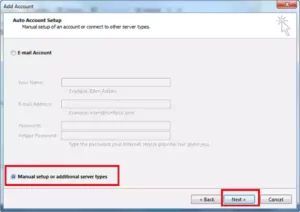
- On the following screen, click on the POP or IMAP option and click Next.
- Then, you will have to fill in some mail server settings information, which is given below:
- Your Name: Fill in your full name.
- Email Address: Your Bell Aliant email address
- Account Type: IMAP
- Incoming Mail Server: imap.bellaliant.net (You can use the same server name for all Bell Aliant email addresses as well as nbnet, sympatico and wrap)
- Outgoing Mail Server: smtpa.bellaliant.net (You can use the same server name for all Bell Aliant email addresses as well as nbnet, sympatico and wrap)
- Username: Your Bell Aliant Email Address
- Password: Your Bell webmail email address. Also, select the Remember Password checkbox.
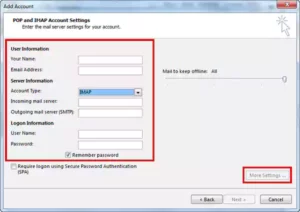
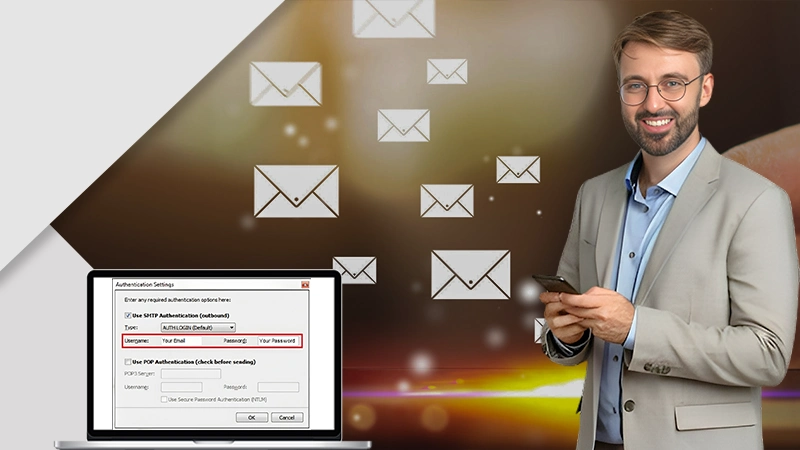
- After you have filled in all the information, click on the More Settings button.
- In the window that will open, go to the Outgoing Server tab, and select the “My outgoing server (SMTP) required authentication” and “Use same settings as my incoming mail server” options
- Then, go to the Advanced tab, fill in the following information, and then, click OK:
- Server Port Number- Incoming Server (IMAP): 143
- Server Port Number – Outgoing Server (SMTP): 2225
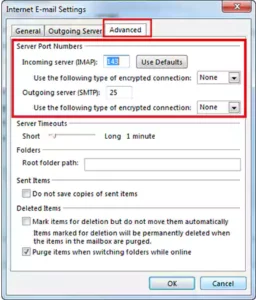
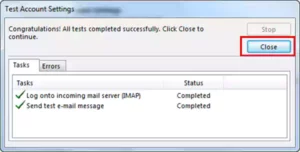
- Finally, click Next, and then, Outlook will check for your account setup information. If they are correctly configured, click Close on the visible window, and then click Finish.
Mac Mail:
- Launch the Mail app on your Mac.
- Then, click on the File / Add Account option.
- On the following screen, you have to provide the information given below and click on the Continue button:
- Full Name: Your name that you want to display on all outgoing emails.
- Email Address: Your Bell Aliant email address.
- Password: Your Aliant’s webmail password.
- Next, you will see the Incoming Mail Server screen, where you have to enter the Bell Aliant email server settings which are as follows, and then, click on Continue:
- Account Type: IMAP
- Description: Add a description of your email account
- Incoming Mail Server: imap.bellaliant.net
- Username: Bell Aliant email address
- Password: Your Bell Aliant webmail password
- Select the Use Secure Socket Layer (SSL) checkbox, and then, set Authentication to Password. Click Continue.
- After that, the Outgoing Mail Server screen will open, and you have to enter the following information and click Continue:
- Description: Add a description of your email account
- Incoming Mail Server: smtpa.bellaliant.net
- Select the Use Only This Server and Require Authentication checkboxes
- Username: Bell Aliant email address
- Password: Your Bell Aliant webmail password
- On the Account Summary screen, you have to enter your account information and click on the Create button.
- Thereafter, you have to change your mail server port information. For that, click on Mail and select Preferences.
- Click on the Account option, and choose the Bell Aliant account that you just created.
- Further, click on the Server Settings option.
- Finally, go to the SMTP Server Options tab, change the Server Port to 2225, and click OK.
How to Change the Bell Aliant Email Password?
There are two ways by which you can change your Bell Aliant Email Password:
- From the My Account Login page.
- From the Internet Overview page after logging into My Account.
The instructions to change your www.aliant.net webmail password using both methods is given below:
From My Account Login Page:
-
-
-
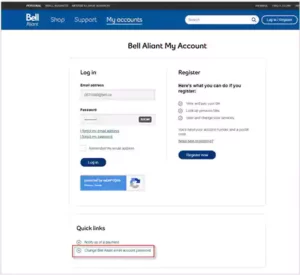
- Begin by opening the browser and going to the My Account page.
- Next, you will see a login form, where you have to click on the Change Bell Aliant Email Account Password present at the bottom of the window.
- After that, the Internet Account page will open, where the Email radio button will be selected. There, you have to do the following:
- Enter your Bell Aliant email address in the Username field.
- Fill in your email account password in the Password field.
- Click on the login button.

Note: Click on the I lost my username or password link if you have forgotten them and need help obtaining your email login information.
- Following that, again, the Internet Account screen opens up. There, from the left side menu bar, select the option to change the password.
- After you have selected the option, follow the instructions displayed on the screen, and you will be able to change your account’s password.
-
-
From the Internet Overview Page:
- On your browser, go to the My Account page.
- Upon reaching the My Account webpage, fill in your Bell Aliant email address and password in their respective fields, and click on the Login button to enter your account.
- Next, the My Account Overview screen will appear. There, click on the Internet section.
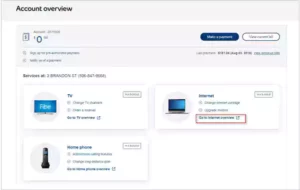
- Further, you will be directed to the Internet Overview screen. There, under the Webmail section, click on the Change or Reset Email Password option.
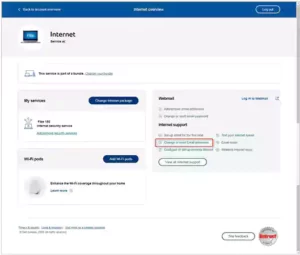
- After that, the Internet Account Login screen will open with the Email radio button selected. There, enter your email address and password in the Username and Password fields respectively, and click on the Log In button.
Note: If you have not already linked My Account to your Internet service, you will be prompted to do so at this point. This allows you to access your Internet service and make changes, such as adding email accounts, without requiring a separate login.
- Then, the Change Your Internet and E-mail Passwords screen will appear. Select the Change Password option from the left menu bar.
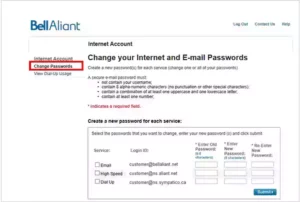
- Following that, you will have to enter your current email password, then the new password, twice, for confirmation, and click on the Submit button.
Note: When the “You have successfully updated your password(s)” message appears on your screen, you will know your password change was successful.
- Finally, click on the Continue button, and you will be back on the main Internet Account page.
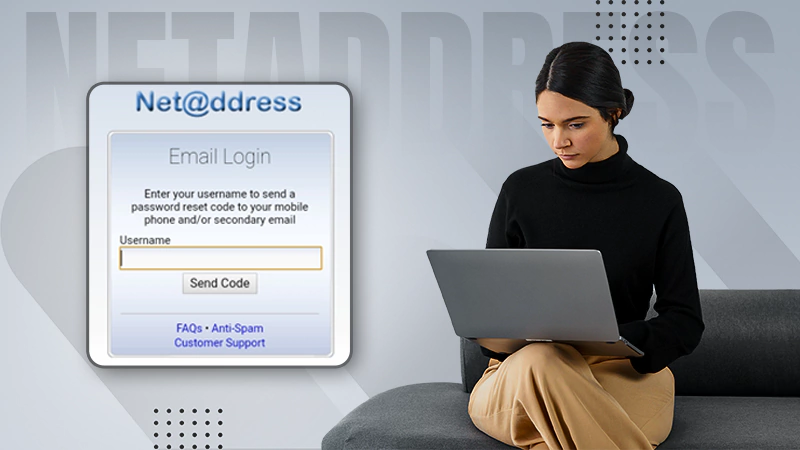
How to Reset Bell Aliant Webmail’s Forgotten Password?
If you have forgotten your Bell Aliant Webmail password, and couldn’t do the login, don’t worry, there’s a solution for that too. Listed further are the instructions by following which you will be able to reset your forgotten password and do the Webmail BellAliant net login:
- Begin by opening your browser and going to Bell Aliant’s My Account page.
- There, you have to enter your email address in the respective field and then, click on the Forgot Password link.
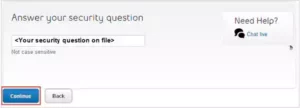
- After that, the Answer Your Security Question screen will appear. There, enter the answer to your question, and click on the Continue button.
- Then, Bell Aliant will send you an email to your email account. So, log into your My Account, and open that email in your inbox.
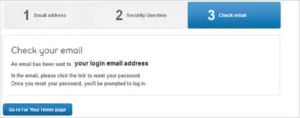
- In the email, click on the Reset Your Password Link.
- Thereafter, the Create a New Password screen will appear. There, you have to enter your new password and type it again to confirm it.
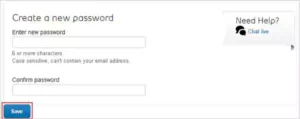
- Once done, click on the Save button.
With this done, you have now reset your Bell Aliant Webmail password. You can now go to the webmail login or My Account login page, fill in the email address and new password, and log into your account.
What to do if you Couldn’t Sign into Your Bell Aliant Email?
If you have difficulty signing into your Bell Aliant webmail account and asking yourself, “Why I can’t access webmail from home?” then here are a few basic things that you can do to resolve the issue:
- It might be the poor internet connection preventing you from accessing your email account. So, the first thing you can do when you can’t access your Bell Aliant webmail is disconnect and again connect to the internet. You can do so by turning off the Wi-Fi or Internet Data of your device or restarting the Wi-Fi router.
- Clear your browser’s cache. If you access your Bell Aliant Webmail through the browser, its cookies, and cache files may be corrupted, because of which you are having issues accessing your webmail account. Clearing the cookies from the browser can help you overcome the problem.
- The next thing you can do is check whether the Bell Aliant Webmail service is down. If the servers of the Bell Email are down, then you can do nothing in this case, and you will have to wait till they are functioning again.
- Further, if you have configured your Bell Aliant email account in any third-party email client like Outlook, Apple Mail, etc., then you need to ensure that they are correctly configured. For that, you have to check their mail server settings, which are given below:
- Account Type: IMAP
- Incoming Server Name: imap.bellaliant.net
- Incoming Port Number: 143
- Outgoing Server Name: smtpa.bellalaint.net
- Outgoing Port Number: 2225
- SSL Required: Yes
- Authentication Required: Yes
- Username: Your Bell Aliant email address
- Password: Your Bell Aliant’s webmail password
Read More:
- How To Recall Email In Outlook Office 365 Webmail?
- How To Find SMTP Server In Webmail?
- How To Read Encrypted Email On Webmail?
- How To Backup Email From Office 365 Webmail?
Sources