How to Create a Distribution List in Outlook? Simple Steps to Create & Edit Outlook Distribution List
It is a tedious task when you have to send the same email to a number of individuals. The hardships of the task even amplify when you have to do the same over and over again on different occasions. Have you ever thought about how you can reduce your struggle here? Well, you don’t have to ponder on it, as the answer is right here! OUTLOOK EMAIL DISTRIBUTION LIST.
If you know how to create a distribution list in Outlook and use it to send emails, you can send as many emails as you want to groups of people by just following a few steps that hardly take a few minutes to implement. Unbelievable, right? But this is what distribution lists do.
You create a distribution list, add members to it to whom you frequently have to send the same email, and just use that list to send emails to that group of people.
Are you curious to know how do I create a distribution list in Outlook? Well then, without further talking, let’s get to doing it!
Simple Steps to Create a Distribution List in Outlook
How to create a distribution list in Outlook? Well, it is no rocket science to create a distribution list in Outlook. It is a pretty straightforward task, which you can accomplish by precisely following the process.
So, in order to know how to create an email distribution list in Outlook, jump right into the steps given below, for your respective device or Outlook version:
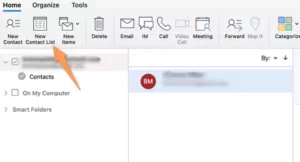
In Outlook for Windows:
- Begin by launching the Outlook app on your Windows.
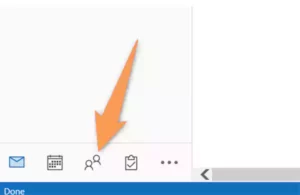
- Click on the People icon located at the bottom of the left sidebar.
- On the following screen, click on the New Contact option present in the top left corner of the window.
- A menu will open next, from where you have to select the Contact Group option.
- A window for creating an Outlook email distribution list will open. There, enter the name of the distribution list in the Name field.
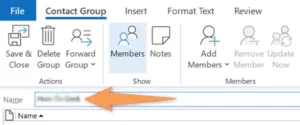
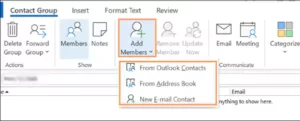
- Then, click on the Add Members option from the top toolbar, and choose one of the options to add recipients to your list: From Outlook Contacts or From Address Book, or New E-Mail Contact.
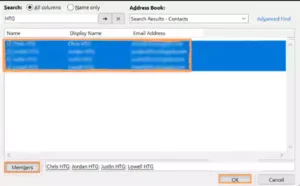
- Next, the list of your selected contacts option will appear. Individually select each member (for multiple selections at a time, hold down the CTRL key and click on the member’s name) and subsequently click on the Member button at the button. Alternatively, double-click on the contact’s name to add them to the distribution list. Then, click OK.
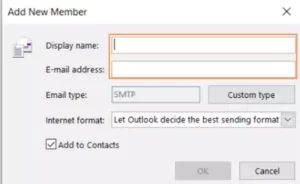
- If you have selected the New E-Mail Contact option (in step 6), then the Add New Member window will open, where you have to enter the name and email address of the new recipient, and then, click OK.
- Once you have added all the recipients to the distribution list, click on the Save & Close option in the top left corner of the window.

In Outlook for Mac:
- First off, launch the Outlook app on your Mac.
- On your Outlook homepage, click on the People icon at the bottom of the left pane.
- Click on the New Contact List button in the top left corner of the following window.
- After that, a window to create a distribution list in Outlook will open. There, enter the name of your distribution list.
- Now, to add recipients to your email distribution list, click on the Add option, and select either From Outlook Contacts or From Address Book, if you have the contacts to be added to the distribution list already saved. In case you want to add a new recipient, click on the New E-Mail Contact option.
- Then, a list of your contacts will open. Either double-click their names or individually select them (for multiple selections at a time, hold down the COMMAND key and click on the member’s name), and subsequently click on the Member button at the bottom of the window, to add the recipients to your list. Click OK once you have added all the members.

- If you have selected the New E-Mail Contact option (in step 5), then the Add New Member window will open, where you have to enter the name and email address of the new recipient, and then, click OK.
- Finally, to finish creating a distribution list in Outlook for Mac, click on the Save & Close option in the top left corner of the email-list-creating window.
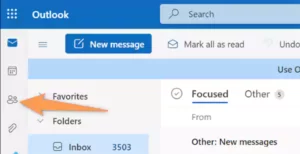
In Outlook for Web:
- First, open the browser on your system, visit the Outlook web page, and access your Outlook webmail by signing into your account.
- Once you are in your Outlook dashboard, click on the People icon present in the left side pane.
- On the following screen, click on the New Contact drop-down, and from the menu, select the New Contact List option.
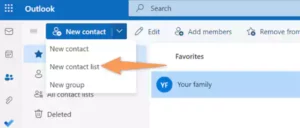
- Next, the window to create an email distribution list in Outlook will open. There, enter the name of the distribution list in the designated field.
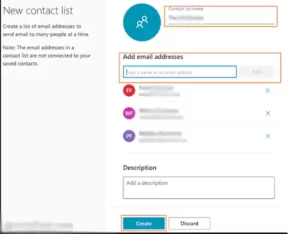
- Now, to add members to the distribution list, enter the email address of the recipients you want to add to the list, one by one, and subsequently click on the Add button.
- After you have added all the members to the distribution list, click on the Create button, and your email distribution list will be created.
After you have successfully created your email distribution list in Outlook, you can find that list under the People section. By clicking on the distribution list name you will see all the members added to it.
How to Edit a Distribution List in Outlook?
Now you know how to make a distribution list in Outlook. But wait a sec, have you forgotten to add a few recipients to the list, added some extras, or mistakenly typed the incorrect distribution list name?
Don’t worry, as after creating a distribution list in Outlook, you can always revisit it and edit it. Stated further are the steps that will assist you in doing just that:
In Outlook for Windows & Mac:
- First off, open the Outlook app on your system, and click on the People icon from the bottom of the left sidebar.
- Then, scroll through the list of your contacts and find your distribution list name in it.
- Right-click on the distribution list name, and select the Edit Contact option from the menu that opens.
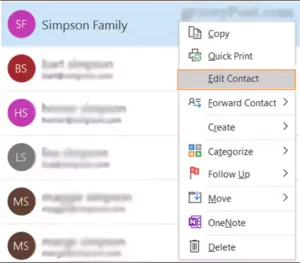
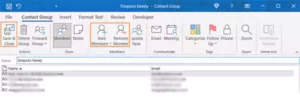
- The distribution list window will open next, containing your initial email list. You can edit the name of the distribution list in the Names field. Add or delete members, by clicking on the Add Members and Remove Member options respectively from the menu ribbon.
- After you are done editing your distribution list in Outlook, click on the Save & Close option in the top left corner of the window.
In Outlook for Web:
- Open your browser, go to Outlook.com, and sign into your account.
- Click on the People icon from the left pane of your Outlook dashboard.
- Next, your contacts saved in your Outlook will appear. Scroll through the list to find your email distribution list name in it.
- Right-click on the distribution list name, and select the Edit option from the menu that opens.
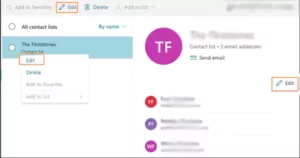
- Now, the Edit Contact List window will open, and here’s how you can edit it:
- Change the name of the distribution list by simply typing in the Contact List Name text field.
- Add new members to the distribution list by typing their email addresses in the Add Email Address text area, and subsequently clicking on the Add button.
- To remove the recipient from the email list, click on the cross (X) icon next to their name in the list.
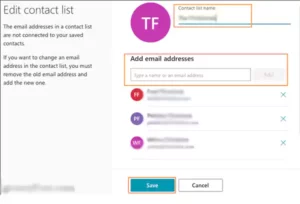
- Once you are done editing your email list, click on the Save button.
Sending an Email to the Distribution List in Outlook
Now that you have a clear understanding of how to create an email distribution list in Outlook, let’s move on to the next section.
How do you send an email to a distribution list? Do you need to enter all the recipients’ names or how exactly does the process go? There must be several questions like this in your mind. But, don’t you worry. Here you will get answers to all those.
Sending an email to a distribution list in Outlook is as simple and straightforward as sending a mail to any individual. Listed below are the steps that will help you send out your first email to the distribution list:
- Launch the Outlook app on your system.
- Click on the New Email button to start composing a new email to send to the email distribution list you just created.

- Type the name of the distribution list in the To field.
- Enter the subject of the email and type in its body.
- Finally, click on the Send button, and the email will be sent to all the members of your Outlook distribution list.
Tip: By typing the email distribution list name in the ‘To’ field, all the recipients will know to whom the same email has been sent. However, if you enter the distribution list name in the BCC field, then your recipients won’t know about the other people to whom the email is sent.
With this, you know all about how to create a distribution list in Outlook, how you can edit it by adding or removing members, and how you can send an email to it.
Read More:
Sources:
- Create a contact group or distribution list in Outlook for PC, Microsoft Support
- Distribution groups, Microsoft Support
Create a contact group, Microsoft Support