How to Set up Business Email on Mac
Having great communication is key to any business’s success. And email is just the thing that anyone cannot ignore.
Electronic mail is widely used for having smooth communications within a company and beyond, such as with clients.
It can ensure a business runs smoothly. Besides its extensive reach, a professional email helps uphold a positive business image.
In this article, we will discuss why businesses need enterprise email accounts and how to choose an email provider to suit your tastes. We’ll also tell you how you can set up one on your Mac computer with a few simple steps.
Why Create a Business Email
It is a cheap marketing tool that helps keep your business connected and organized. A well-set email can help increase traffic to your business, as you’ll ensure your customers are notified of the new stock, promotions, and expected changes. Communications within the organization are also enhanced. Here are some benefits of having a business email:
- Build business credibility
- Captivate customer trust
- Data backup and privacy
- Improved professional perception
- Cost-effective communication tool
- Better data security
You need to set up an enterprise email to seize these benefits and more. As a Mac user looking forward to setting up a business email, you’re in for a treat. The process is simple, and within a few minutes, you’ll be ready. Here is a step-by-step guide on how to set up a business email on Mac.
Pick a Service Provider
When setting up a business email, you must ensure it looks professional for your target audience to read the message and not mark it as spam. You can choose email providers from Google Workspace, Yahoo, Microsoft 365, and iCloud.
You can also use your chosen domain through a service like Bluehost. These providers vary in package protection and cost. As you pick an option, the best way is to review your business needs and budget to decide which provider best suits your situation.
Gather Email Account Details
This is not the usual email where you just create one and you’re done. Business emails need some things to be put straight first.
Before diving into the setup process, ensure you have the necessary information, such as your username, email address, strong password, and incoming and outgoing server information, ready.
Open the Apple Mail App
Launch the Mail app on your Mac; if you have an existing email account, it will automatically redirect to it. The Add Account option will automatically appear if you don’t have an email account on your device. On the menu bar, click on “Add Account.”
DID YOU KNOW?
Apple Mail originated from NeXTMail, which was developed by NeXT for its NeXTSTEP operating system. Apple acquired NeXT in 1997.
Choose Your Mail Account Type
Depending on your email provider, select your account type. But if you prefer a custom-made domain, select “Other Mail Account” and click continue.
Enter Your Account Details
Here is where you’ll use the account information you gathered. Enter these details in their respective fields, then click “Sign in.” Automatic configuration may fail, meaning you must enter your account information manually. Upon completing this information, click “Next.”
Enter Your Incoming Server Address
These are the details you obtain from your email provider or IT department. The details include the server address, port number, and the encryption protocol.
Configure the Outgoing Server Address
Your email provider or domain host will provide you with this information. Enter every detail into its respective fields. This includes the server name, port number, and security settings.
Check Your Account Setting
Check account settings by clicking “Advance” and reviewing if the incoming and outgoing mail server settings are correct, then confirm.
Upon clicking “Done,” your enterprise mail Mac will be ready, allowing you to send and receive emails.
As you send and receive emails on your business email, you might experience some issues. The common problem many face is when the email becomes unresponsive. This is especially common if you have pending updates on your Mac or your internet connection is unstable. Here is what you can do when Mac Mail isn’t working.
Ways to Fix Unresponsive Mac Mail
Here are effective ways to fix unresponsive Mac mail:
Close and Reopen the Mail App
The issue might only be on the Apple Mail. Force it to close by pressing Option+Command+ Escape, opening the Force Quit window. Select the Mail app and click Force Quit.
Check Your Internet Connection
Poor internet connection could be the main culprit behind unresponsive Mac’s enterprise email. Unstable or slow internet connections can cause Mail to become unresponsive or delayed. Check your internet connection, such as by loading a webpage.
Update Your Mail App
If it has been a while since you updated your Mail app, it could be the cause of the unresponsiveness. Apple releases updates with security patches and enhances the performance of its applications.
Ensure you update your Mail app by frequently checking for updates on the App Store. On the App Store, go to the “Updates” tab, check for any available updates, and install them.
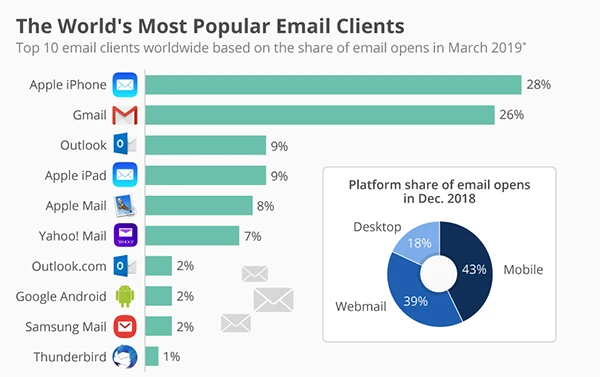
Apple Mail is one of the most popular email clients in the world with a mail opening rate of over 28%.
Double-Check Your Email Account Settings
Might your enterprise email Mac settings be the culprit for your misery? Any incorrect setting on an email account can cause your Mail app to stop working. Check your unresponsive account settings through Mail Preferences and review them to ensure everything is correct.
Clear Cache
Your Mac collects and stores data, which accumulates. This accumulated data (cache) can cause the Mail app to stop functioning when not cleared for some time. Clear these files, and you may unfreeze your app and even speed up your Mac’s performance.
You can clear the cache by following these instructions:
- Open Finder.
- Click on the Go menu, then Go to Folder.

- Key in /Library/Caches.
- Find and delete the com.apple.mail and reboot the app.
Your Mail app can unfreeze after following the above steps. Even with these techniques and more, it could fail to respond. In such cases, you can contact your email provider and let them know of your persisting issue.
Conclusion
Setting up a business email can seem daunting, but as a Mac user, it’s simple and less time-consuming.
With the above steps, you can easily set up enterprise email on Mac and troubleshoot common issues. This way, you’ll have a secure and effective email for all your business communications.