How to Change the Inbox View in Outlook? A Comprehensive Guide!
Changing the Inbox view in Outlook can significantly enhance your email management experience, allowing you to customize the way you interact with your messages.
With Outlook’s versatile features, you can organize your inbox to suit your preferences. Whether you prefer a compact list, a detailed preview, or grouping messages by specific criteria, or a distribution list, Outlook offers a range of options to tailor your inbox view. This makes it easier for you to access, organize, and prioritize your emails on the webmail app.
So, today in this guide, we will explore the different methods and settings available, which empower you to personalize your Outlook inbox and optimize your email workflow for greater efficiency and productivity.
That being said, let’s begin with how to change the view in Outlook—
How to Change Outlook View Layout?
Microsoft Outlook, which debuted in the 1990s as part of Microsoft Office, is a widely used tool for managing emails and calendars, both for business and personal use. While it offers robust features for professional users, newcomers may find it a bit overwhelming.
Thus, to enhance user-friendliness, Microsoft has introduced the New Outlook client. This version simplifies the interface to resemble Outlook.com, a web-based suite. For those who prefer the familiarity of web-based access, Outlook Web Access (OWA) offers a solution. OWA provides a range of features that allow users to access Outlook webmail easily.
However, users transitioning to this version will notice a different appearance and the absence of some features, such as the ability to create new contact lists.
As a result, many users choose to revert Outlook to old view. If you also prefer the classic Outlook experience and wonder ‘how to change view in outlook emails that is changed’ know that changing the Outlook view layout is easy and this guide will show you how to do it on both Mac and Windows.
We’ll break down the ‘how to change outlook view’ steps for a clear understanding, so you can make your Outlook work the way you want.
Using these simple instructions, you can quickly improve your email management, task handling, and scheduling, leading to enhanced productivity in real-time!
How to Switch Back to the Old Outlook View on Mac?
Option 1: Revert to Classic Outlook View
- Open ‘Outlook’ and navigate to the ‘Outlook’ menu.
- From the menu, deselect the ‘New Outlook’ option.
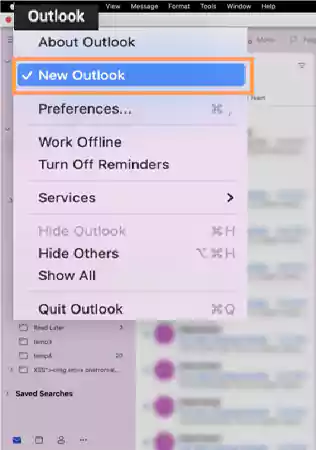
- Then, you’ve to simply confirm your choice by clicking the ‘Revert’ button.
- After that, ‘Wait’ for the application to change to the Classic Outlook view.
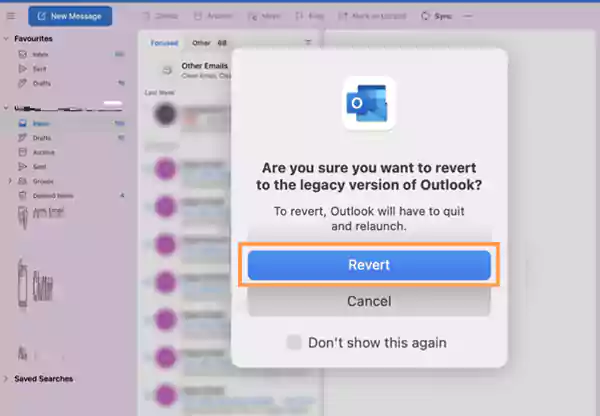
Option 2: Revert to Legacy Outlook View
- Launch ‘Outlook’ and go to the ‘Help’ menu.
- There, you’ve to select the ‘Revert to Legacy Outlook’ option.
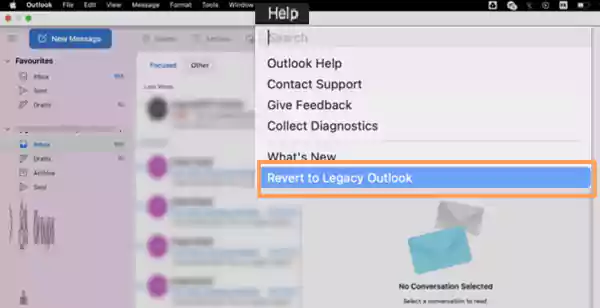
- Then, simply confirm your decision to ‘Switch to Legacy Outlook for Mac.
- Next, you need to click the ‘Revert’ option.
- After that, allow the application to ‘Restart and Apply the Changes.’
Option 3: Enable ‘Use Classic Interface’ Option
- Open ‘Outlook’ on your Mac.
- Then, click on ‘Outlook’ in the top menu bar and select ‘Preferences’ to access Outlook Preferences.

- In the Preferences window, you’ve to click on the ‘General’ icon.
- After that, simply look for an option that says ‘Use Classic Interface’ or something similar, and ‘Enable’ it.
- Now, you’ve to ‘Confirm’ your choice (if prompted).
- Once you’re done, ‘Close’ and then ‘Reopen’ Outlook to verify that you are now using the old/classic interface in Outlook.
This is how to change view in Outlook on Mac via different options. However, if you’re a Windows user, you need to follow the steps below—
How to Change to Outlook Classic View on Windows?
Option 1: Disable ‘Try it now’ Feature
- Launch ‘Outlook’ on your Windows PC.
- Then, simply locate and toggle the switch next to ‘Try it now’ to the “Off” position.

Option 2: Adjust Outlook Appearance
- Open ‘Outlook’ and navigate to the ‘View’ tab.
- Then, click on ‘Change View.’
- Next, you’ve to ensure that the ‘Compact’ option is chosen.
- After that, click ‘Change View’ to confirm.
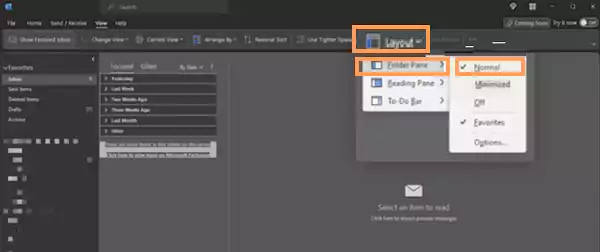
Option 3: Modify Layout
- Access ‘Outlook’ and go to the ‘View’ tab.
- There, you’ve to open the dropdown menu labeled ‘Layout’ instead of ‘Change View.’
- After that, in the layout section, click ‘Folder Pane’ and select ‘Normal.’
Note: Keep in mind that you also have the option to adjust other View settings to tailor Outlook’s appearance and features to suit your preferences.
Now that you know how do I change outlook to classic view, you can customize your Outlook view to align with your preferences, tailor how your inbox and calendar appear within the application. This way, by changing and customizing your Outlook view, you can ensure that the information you need is readily accessible every time you open the app.
Why Switch Back to the Classic Outlook View?
For those who might still be uncertain, switching back to the classic Outlook view can be advantageous for various reasons. Some of them are listed below—
- First, it provides a familiar interface for longtime users who may find the modern view disorienting.
- Classic View simplifies navigation with its traditional toolbar layout, making it easier for users to access essential functions.
- Classic view also uses fewer resources, which may lead to faster performance on older computers or in low-bandwidth situations.
- Additionally, it can increase productivity for those who prefer a more straightforward and streamlined email experience.
- Ultimately, the choice to switch back to Classic view in Outlook is a matter of personal preference and efficiency.
What Different Layouts Are Available in Outlook?
| Layout Option | Description |
| 1. Classic View | A traditional layout similar to older versions of Outlook, with familiar toolbar and navigation. |
| 2. Modern View | A contemporary interface with a streamlined ribbon, designed for a more visually appealing look. |
| 3. Compact View | A view that reduces email spacing to display more messages on the screen, suitable for efficient scanning. |
| 4. Single View | Each email occupies the entire reading pane, which is ideal for focusing on one message at a time. |
| 5. Preview View | Displays a list of emails with a preview of the selected message, giving you a balanced view of both email headers and content. |
| 6. Message List View | Organizes emails in a tabular format, showing details such as sender, subject and date, similar to a spreadsheet. |
| 7. Grouped by Date View | Group emails by their arrival date for making it easier to navigate and find messages chronologically. |
| 8. Grouped by Sender View | Organizes emails by sender name for simplifying the organization of messages from specific contacts. |
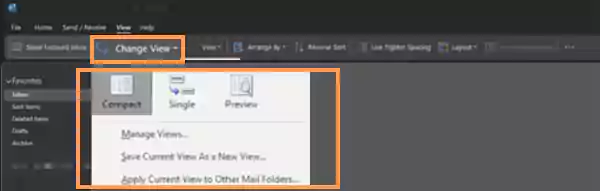
How to Change Outlook View with a Different, Existing View?
- Open the ‘Inbox folder.’
- Click the ‘View’ tab in the Ribbon.
- There in the Current View button group, click the ‘Change View’ button.
- In doing so, a menu will appear with various view options. From them, choose any of the views listed to apply them to your Inbox.
Note: The default choices include ‘Compact,’ ‘Single,’ and ‘Preview,’ with ‘Modern’ being the default view.
- To further customize your views, select the ‘Manage Views…’ command from this menu.
- Then, in the ‘Manage All Views’ dialog box, you’ll see all available views for the current folder, along with their settings. From them, choose a ‘View’ you want to modify, or reset any changes made to a view.
- Additionally, you can “create, edit, or delete your own custom views” within the ‘Manage All Views dialog box.’ This dialog box also allows you to ‘customize views for all folders’ in Outlook, providing comprehensive control over your email display preferences.
How to Change Outlook View by Creating a New, Custom View?
- In Outlook, open the ‘Inbox folder’ and click the ‘View’ tab in the Ribbon.
- Then, in the ‘Current View’ group, select ‘Change View,’ and choose ‘Manage Views…’.
- When you do this, the ‘Manage All Views’ dialog box will open. In that, click the ‘New…’ button located on the right side to create a new custom view.
- Following that, the ‘Create a New View’ dialog box will appear. In the ‘Name of new view:’ text box, type a name for your new view. Below the name field, select the type of view you want to create from the following options:
- Afterward, the ‘Create a New View’ dialog box will appear. In the ‘Name of new view:’ text box, enter a name for your new view you want to create from the following options:
- ‘Table’: Displays items in columns and rows.
- ‘Timeline’: Shows items accessed over a time period.
- ‘Card’: Presents items in a card view.
- ‘Business Card’: Utilizes an alternate card view.
- ‘People’: Displays a list of people, similar to the ‘People’ view in the Contacts folder.
- ‘Day/Week/Month’: Shows items in a day/week/month style.
- ‘Icon’: Displays icons for the items.
- After selecting the base folder view type, specify ‘who can see this new view’ by choosing one of the options:
- ‘This folder, visible to everyone’
- ‘This folder, visible only to me’
- ‘All Mail and Post folders’
- Once you’ve specified that, click ‘OK’ to proceed, which will open another dialog box called the ‘Advanced View Settings’ dialog box.
- In this dialog box, you’ll find ‘seven buttons for setting advanced view’ options.
Note: Depending on your selected base view type, not all buttons may be available.
- Using the seven buttons, configure your advanced view settings as needed and click ‘OK’ to save your new custom view.
That’s it. Your custom Inbox view is now created and ready for use in Outlook.
How to Change Outlook Inbox View via Advanced Settings?
- Open the ‘Inbox folder’ of Outlook and click the ‘View’ tab in the Ribbon.
- Then, in the Current View group, select ‘Change View,’ and choose ‘Manage Views…’ to open the ‘Manage All Views’ dialog box.
- After that, to modify the current view by adding columns, click the ‘Columns…’ button located in the ‘Advanced View Settings’ dialog box.
- This action opens the ‘Show Columns’ dialog box. There, use the ‘drop-down menu’ to select a set of fields to display in the left list.
- Following that, to add a field to your new view, choose it from the left list and click the ‘Add’ button. This action moves the selected field to the list on the right, which represents the columns that will appear in your view.
- Now, to change the order of the columns in the list, select a field from the list on the right, and then use the ‘Move Up’ and ‘Move Down’ buttons to rearrange the order until it is in the desired sequence.
- After adding and organizing the fields to your preference, click ‘OK’ to save your changes.
Your Inbox view in Outlook will now display the selected columns in the order you specified. So, this is how your outlook view changed via Advanced Settings.
How to Change Outlook View by Grouping Items in the View?
- Open ‘Outlook,’ go to the ‘Inbox folder,’ click the ‘View’ tab in the Ribbon, select ‘Change View,’ and choose ‘Manage Views…’ to open the ‘Manage All Views’ dialog box.
- Then, in order to modify the current view by grouping items, click the ‘Group By…’ button.
- This action will open the ‘Group By’ dialog box. In the Group By dialog box, locate the drop-down menu labeled ‘Group items by’ and select a field by which you want to group the view’s items.
Note: This grouping feature is commonly used with the ‘Table’ style base view, as it organizes items with the same values in the selected field(s) into expandable and collapsible groups within the table view.
- You can select up to ‘four fields’ for grouping items. For each field you select, you can set the sorting order by choosing either ‘Ascending’ (A-Z, 1-9) or ‘Descending’ (Z-A, 9-1) from the options on the right end of each grouped field.
- Once you’ve configured the grouping settings to your satisfaction, click ‘OK’ to apply the grouping to your view.
By doing this, your Outlook Inbox view will display items grouped based on the selected field(s) and sorting order.
How to Change Outlook View by Changing the Default Sort Order of the View?
- Open Outlook, go to the Inbox folder, click the ‘View’ tab in the Ribbon, and then select ‘Change View > Manage Views…’ to open the ‘Manage All Views’ dialog box.
- Afterward, to modify the current view and change the default sort order, click the ‘Sort…’ button, which opens the ‘Sort dialog box.’
- In that dialog box, locate the drop-down menus under the ‘Sort items by’ and ‘Then by’ sections.
- After that, use the drop-down menu to specify the field(s) by which to sort the view. You can sort by up to four fields and for each field, select ‘Ascending’ or ‘Descending’ from the right end to set the sorting order.
- Now, use the ‘Select available fields from:’ drop-down list at the bottom of the dialog box to choose the set of fields from which to select the sorting fields.
- Once you’ve configured the sorting settings to your preference, click ‘OK’ to apply the changes.
In this way, your Inbox view in Outlook will display items sorted according to the specified field(s) and sorting order.
How to Change the Outlook Inbox by Filtering Items in the View?
- On Outlook, click ‘Filter…’ to open the ‘Filter’ dialog box.
- In the filter dialog box, you’ll see that it has four tabs: ‘Messages,’ ‘More Choices,’ ‘Advanced,’ and ‘SQL.’
- The ‘Messages’ tab offers filtering by common email fields.
- The ‘More Choices’ tab lets you filter by categories, message statuses, and less-used fields.
- On the ‘Advanced’ tab, allows you to apply the customized filter condition to your data or search criteria
- The ‘SQL’ tab allows you to create a filter using Structured Query Language.
- From the four, choose the ‘Filter tab’ that matches your criteria for including or excluding items in your view.
- After setting your filters, click ‘OK’ to apply them to your view.
How to Change Outlook View via Customizing Appearance of Items in the View?
- To begin, click the ‘Other Settings…’ button on Outlook to open the ‘Other Settings’ dialog box.
- In this dialog box, you can ‘Customize the font and appearance settings’ for your view.
Note: The available options vary based on the view style you are working with.
- Once you’ve made your desired adjustments, click the ‘OK’ button to apply these changes to your new view.
How to Change Outlook View via Changing the Items Appearance Based on Specific Conditions?
- Firstly, click the ‘Conditional Formatting…’ button on Outlook to open the ‘Conditional Formatting’ dialog box.
- There in, to add a new rule, click the ‘Add’ button on the right side of the dialog box.
- Then, simply enter a name for your new rule in the ‘Name:’ text box.
- Next, you’ve to click the ‘Font…’ button to configure the font formatting for items that meet your criteria.
- After that, simply click ‘OK’ in the Font dialog box to confirm your font settings.
- Now, click the ‘Condition…’ button to define the criteria that trigger the formatting you’ve chosen. Doing so, you’ll find similar options as when setting a view’s filter.
- Once you’re done setting the criteria, click ‘OK’ to apply it.
- Finally, click ‘OK’ again to apply your conditional formatting rule.
These steps allow you to create and apply specific formatting rules based on your criteria in Outlook.
How to Change Outlook View through Modifying Column Appearance in Table View?
- On Outlook, click ‘Format Columns…’ to open the ‘Format Columns’ dialog box.
- In this dialog box, choose the ‘field’ whose display you want to change from the list on the left side.
- After doing that, you need to adjust the ‘Display settings’ on the right side of the dialog box.
- Once you’ve customized the column display, click ‘OK’ to save your changes.
How to Save and Apply Advanced View Settings to Change Outlook View?
- Once you’re satisfied with all the advanced settings, click ‘OK’ in the ‘Advanced View Settings’ dialog box to go back to the ‘Manage All Views’ dialog.
- In this dialog box, you’ll now see your newly created ‘View’ in the list of available views.
- Now, to apply the view, select its ‘Name’ in the list.
- Following this, you’ve to click the ‘Apply View’ button at the bottom of the dialog box to activate it.
Alternatively, you can select your custom view by clicking the ‘Change View’ button in the ‘Current View’ group on the ‘View’ tab of the Ribbon.
Bonus: How Can You Organize Outlook Messages More Effectively?
There are several effective ways to organize your Outlook messages. Some of them are—
- Folders: Create folders and subfolders within your Outlook mailbox to categorize and store emails based on different criteria
- Rules: Run Outlook’s built-in rules and filters to automate email sorting.
- Flagging and Categories: Use flags and categories to mark important emails for follow-up or to categorize them based on different criteria.
- Search: Use search for quick access to specific emails.
- Quick Steps: Create shortcuts for common actions to perform multiple actions with a single click.
- Conversion View: Enable conversation view to group related emails together in a thread.
- Priority Inbox: Use the Priority Inbox feature to have important emails appear at the top of your inbox.
- Clean Up Tool: Use a clean up tool that helps you reduce email clutter by automatically deleting redundant messages within a conversation thread.
- Ignore Conversations: Use the Ignore feature to move all future messages in that conversation to your Deleted Items folder.
- Customize Your Inbox Views: Customize your inbox layout to display emails in a way that suits your preferences.
- Archive: Use the Archive option to store old emails that you don’t need to access frequently.
- Rules for Sent Items: Create rules for your sent items to automatically file copies of sent emails into relevant folders.
- Shared Mailboxes and Groups: Collaborate efficiently with teams to manage and organize email conversations related to specific projects or departments.
These above listed ways help you keep your Outlook messages organized.
Wrapping Up!
That’s all about how to switch back to the old outlook! This guide has provided comprehensive insights into how to change Outlook view layout effectively.
We have explored methods for changing the view on both Mac and Windows, with a particular focus on reverting to the classic Outlook view. Furthermore, we have also discussed the significance of switching back to the classic view and highlighted the various layouts available in Outlook.
Not only that, we even introduced the concept of how you can organize your Outlook messages to provide a holistic approach to improving your email experience.
So, by following the steps outlined in this guide, you should be able to customize your Outlook interface to match your preferences and enhance your Outlook experience. This will make it more efficient and comfortable for managing emails, tasks, and appointments, ultimately boosting your overall productivity.
Read Next: How to Find Unread Emails in Outlook? Simple Ways to Filter Unread Emails in Outlook
FAQs
Ans: To get your Outlook inbox back to normal view—
- Go to the ‘View’ tab.
- Click on ‘Change View.’
- Select ‘Compact’ or ‘Single’ from the dropdown menu.
Ans: To change your Outlook email inbox view—
- Open ‘Outlook.’
- Then, go to the ‘View’ tab.
- After that, click on ‘Change View.’
- Now, choose from options like ‘Compact,’ ‘Single,’ ‘Preview,’ or ‘Message List’ to customize your inbox layout.
Ans: Yes, you can sort your Outlook inbox by the sender’s name. To do so, simply click on the ‘From’ column header in your inbox, and there, you can arrange emails alphabetically by sender’s name.
Ans: To switch your Outlook to the normal (classic) view, you need to—
- Click on the ‘View’ tab.
- Then, select ‘Change View.’
- After that, choose ‘Classic View’ from the available options.
Ans: To revert Outlook to old view—
- Go to the ‘View’ tab and click on ‘Change View.’
- Then, select ‘Apply Current View to Other Mail Folders.’
- After that, choose ‘Inbox’ and click ‘OK’ to revert Outlook to the original view.
Sources