How to Backup Gmail? 4 Ways to Take a Backup of Your Gmail Emails
One question that has been asked very frequently is, how to backup Gmail? But, before that, many people also have queries like, with the cutting edge security and privacy features provided by Gmail, is it necessary to take Gmail backup, though?
Well, to answer that, consider this…
Since Gmail is one of the most popular email service providers, many people nowadays rely on Gmail accounts for their personal and professional needs. Therefore, most of their important conversations and files are exchanged through it.
Now, imagine a day when you woke up and found all your emails and data gone! Wouldn’t it be a thunder-breakingly shocking and dreadful situation? And so, it is important to back up Gmail emails.
If you still aren’t convinced, and wondering how this can be possible, then there are tons of other reasons why you would want to back up your Gmail account. Like, when switching to a new email service provider, safekeeping your data for future reference, or simply having a backup in case you are locked out of your account or someone has hacked into it.
So, you see, it is significant to have your data saved somewhere else before you are hit by a dreaded situation. And now, back to the main question, how to back up Gmail emails? Well, read through the article below and find that too.
How to Backup Your Gmail Account?
The process of backing up Gmail emails might seem to you a bit lengthy, but it is straightforward. By simply following the steps given below, you will have a backup file containing all your Gmail email data.
Given below are the steps by which you can back up your Gmail account emails:
- First off, open the browser and sign into your Gmail account.
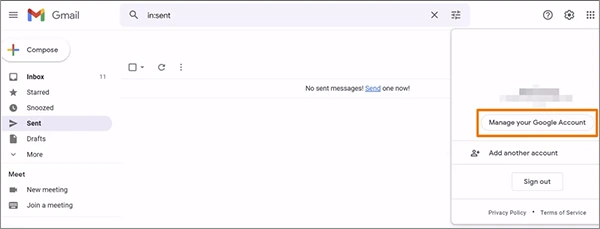
- Once you are into your account, click on the Profile icon present in the upper right corner and select the Manage your Google Account option.
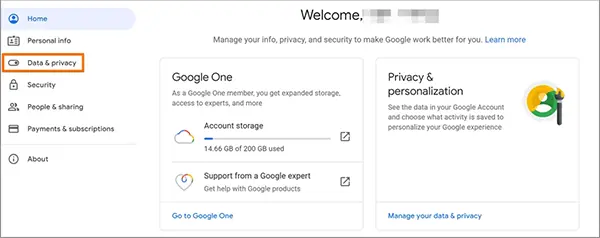
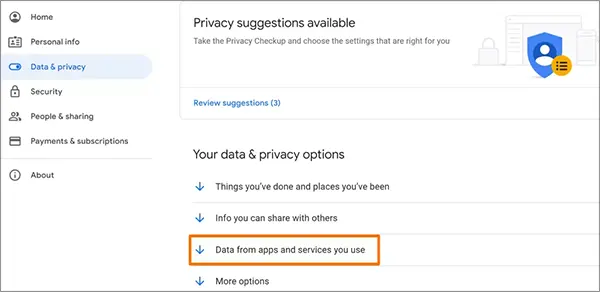
- This will take you to your Google Account page. From the left side menu of the page, click on the Data & Privacy option.
- Then, scroll down on the following page to the Your Data & Privacy Options section, and click on the Data From Apps and Services You Use option.
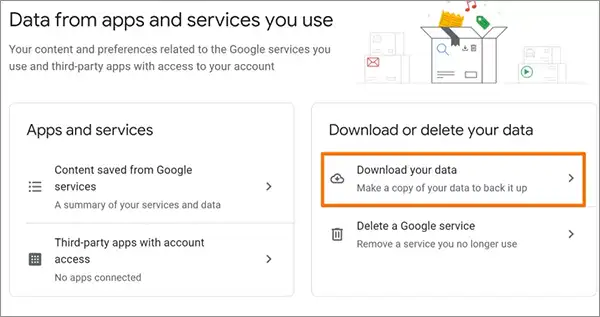
- After that, click on the Download Your Data option.
- Next, you will be forwarded to the Google Takeout page. There, click on the Deselect All option.
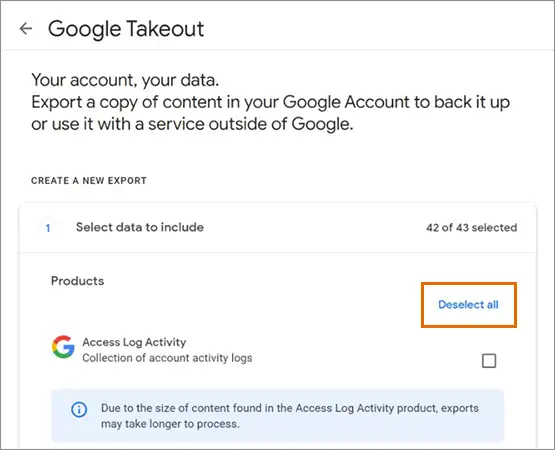
- Then, scroll down on the page to the Mail section and select it by clicking on the checkbox.
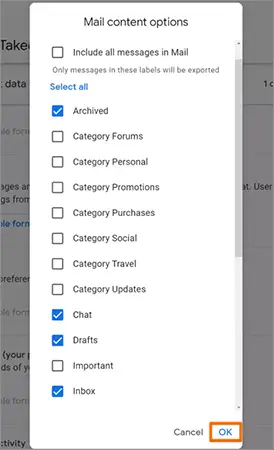
- There, click on the All Mail Data Included option.
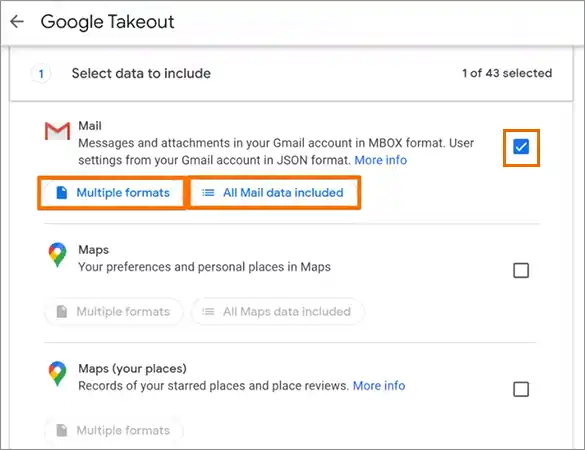
- Thereafter, a window will pop up on your screen. There you can select from which label you want to download Gmail emails. You can also select the Include All Messages in Mail option to download everything related to your email. Once done, click OK.
- Click on the Next Step button present at the bottom of the screen.

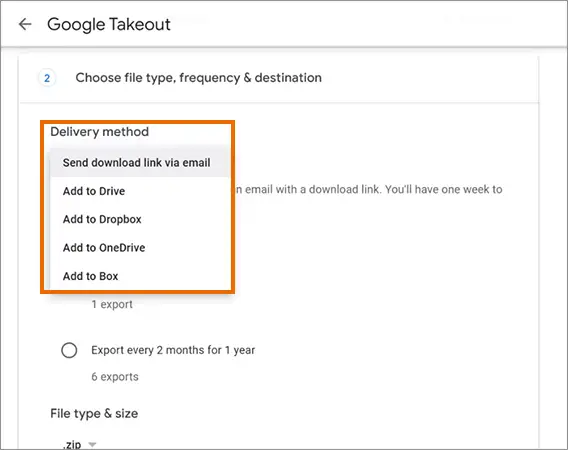
- Next, you have to select the Delivery Method by which you want to send or save your generated backup file.
- Then, in the Frequency, you can select whether to make a Google email backup just this time or do the same every two months for one year. Also, select the File Type and Size of the backup.
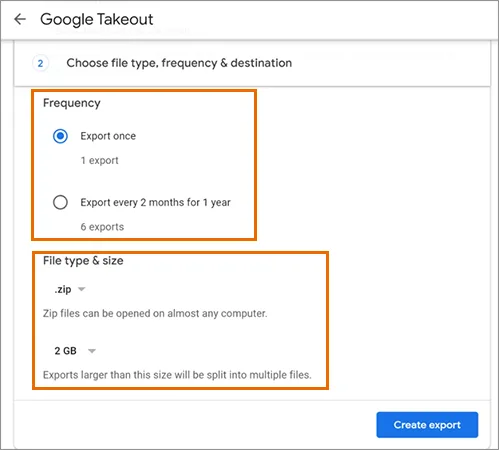
Note: If you have a large amount of data, it will be divided into smaller file sizes based on the size you select in the above step. For example, suppose your backup file size is 10 GB and you selected the file size of 2GB. Then 5 files will be created for you to download.
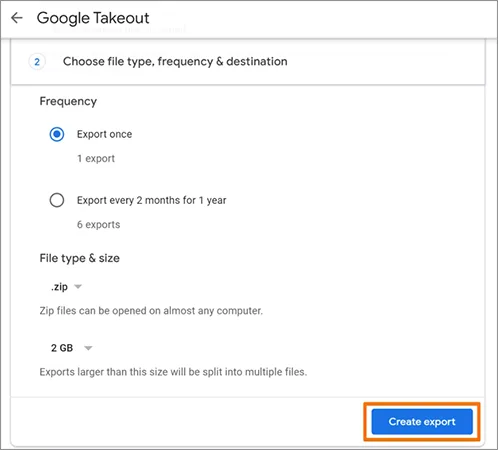
- Finally, click on the Create Export or Link Account and Create Export (In case you selected OneDrive, Dropbox, etc., in the Delivery method) button, depending on the delivery option you have chosen.
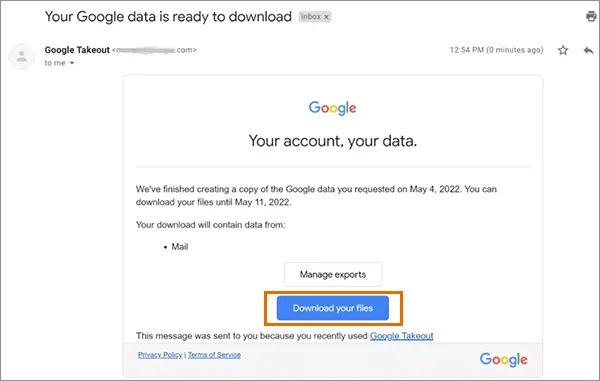
It will take at least a few hours, if not days, for Google to complete the backup process and create a downloadable file of it. Once it is done, Google will send you an email to download and manage the export.
In the emails, clicking on the Download Your File option will take you to a page where you first have to verify your identity by entering your account password. After that, you will see the page where you can download your Gmail backup data.
Also, bear in mind that if several labels were chosen, multiple files will be created. Further, if you have chosen the File Type to be ZIP, then you will need to extract it to get to the actual data.
And, in the extracted files, the MBOX file will be the one containing all your Gmail backup emails. You can open this file in any of your desktop email clients. If you don’t know how you can see the backup Gmail emails file, then refer to the steps given below.
Opening the Exported Gmail’s Email Backup File
After you have downloaded and extracted the backup file, you will need a desktop email client to view the data inside the main MBOX file.
Listed below are the steps which you can follow to do so using Thunderbird, if you have any other email client, then the steps will be different:
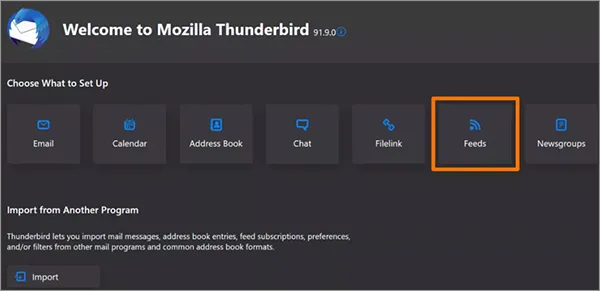
- First off open the Thunderbird email client on your system, and click on the Feeds option to make an empty account.
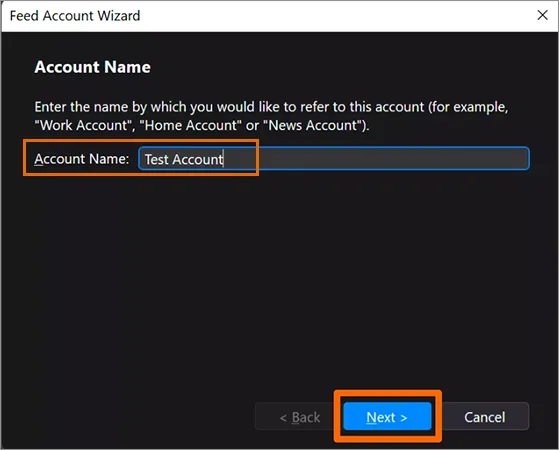
- Fill in the name of the account and click Next.
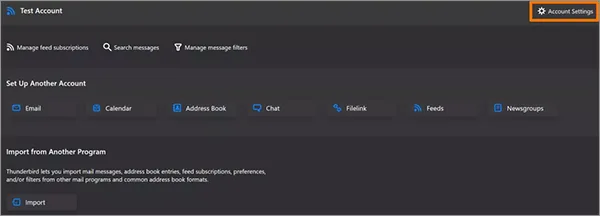
- Then, on the following screen, click on the Account Settings option from the top right corner of the screen.
- This will open the Account Settings page. There, click on the Browse button under the Message Storage section to navigate to the location where your MBOX file(s) are stored. Once you are on the location, select the files and click Open.
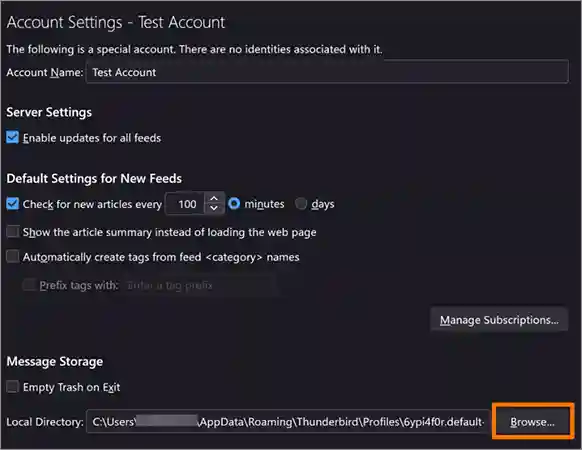
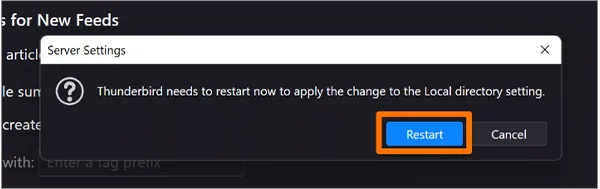
- Thereafter, a prompt will show up on your screen to restart the Thunderbird. Click on the Restart button to do so.
- With this done, Thunderbird will now access and open your downloaded Gmail email backup data.

Use Third-Party Email Clients to Create Gmail Backup
This is the second method by which you can backup your Gmail account. Using a desktop client such as Thunderbird, Microsoft Outlook, or Apple Mail is a more automatic approach to backup your Gmail email.
In this method, you will configure your desktop email client to retrieve messages from your Gmail account and save them to your machine using the IMAP protocol. It is advised that before going further, you should know about email server settings.
Further, this is a 2-step process, in which you first have to enable IMAP in Gmail and then add your Gmail account to Outlook. But don’t worry about how to do that. Here’s how to back up Gmail using a third-party email client:
Note: In the following process, I used Outlook to create a Gmail backup. However, if you have any other email client, then the steps for doing so will be different in it.
Step-1: Enable IMAP in Gmail
- Log into your Gmail account on your browser.
- Then, click on the Settings icon from the top right corner, and select the See All Settings option.
![]()
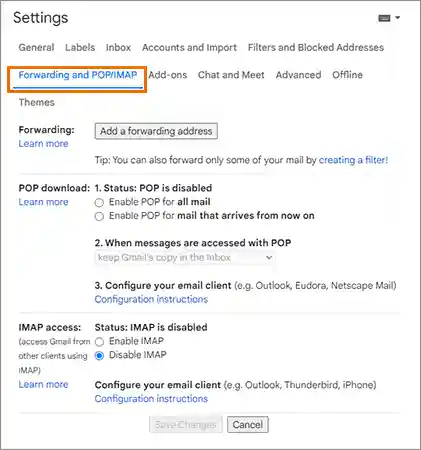
- Go to the Forwarding and POP/IMAP tab in the Settings window that opens.
- Under the IMAP Access section, select the Enable IMAP option.
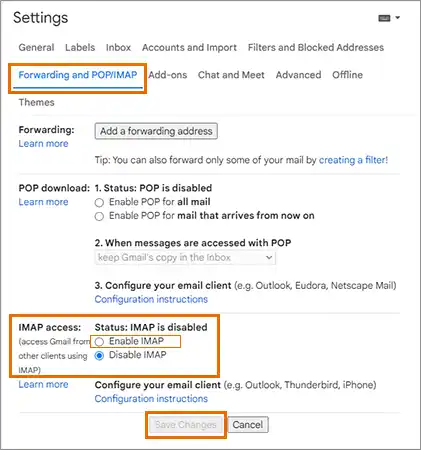
- Then, click on the Save Changes button at the bottom of the screen.
Steps-2: Add your Gmail Account to your Desktop Email Client
The following step is to connect your Gmail account to your desktop email client, which is Outlook in this case.
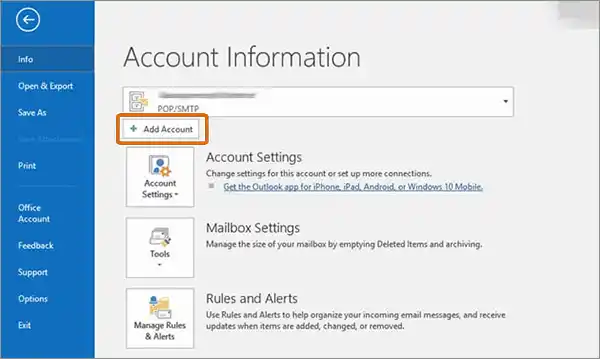
- Begin by opening the Outlook app on your system, and clicking on the File menu option.
- In the Account Information page of the Info tab on the next screen, click on the Add Account button.
- On the following screen, enter your Gmail address, and click on the Connect button.

- After that, you will be prompted to enter your password and click OK.
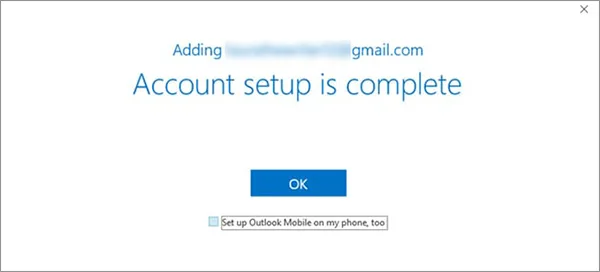
- Finally, click Finish and your Gmail account will be connected to your Outlook
After this is done, all the messages sent to your Gmail account will now be delivered to MS Outlook as well. Further, if you lose access to your Gmail account in the future, you will still be able to view your older Gmail messages in your Outlook.
But keep in mind that deleting a message from your Gmail account will also remove it from your Outlook inbox.
IMPORTANT: Filters and other organizing tools used in your Gmail inbox may not be carried over to your desktop email application, be it Outlook or any other client.
Forward your Gmail Emails to Another Email Address
Forwarding your Gmail email to another email account is yet another method of taking a backup of your Gmail emails. This will, of course, involve a second email account, which you can trust to save your data.
So, if you want to use another email account as a backup for your Gmail account, you can set up automatic forwarding to another email address. This will direct all your incoming emails to that email address.
Here’s how to do this:
- Open your Gmail account on the browser.
- Click on the Settings icon present in the upper right corner of the screen, and then, click on the See All Settings option.
![]()
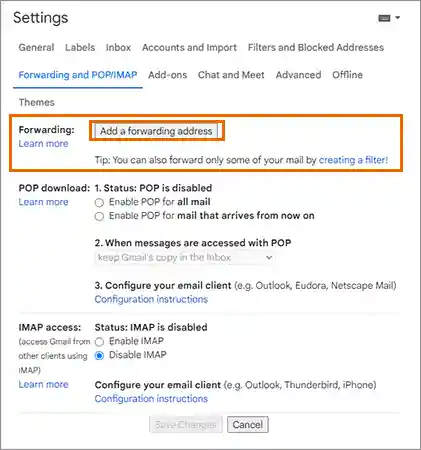
- Now, go to the Forwarding and POP/IMAP tab in the Settings window.
- In the Forwarding section, click on the Add a Forwarding Address option.
- Then, enter the email address to which you want to forward all your emails.
- Then, click Next > Proceed > OK.
- After this, a verification email will be sent to the provided email address. You have to open that email and click on the verification link present inside it.
- Now, head back to the Settings window of the Gmail account for which you are enabling forwarding, and refresh your browser.
- Then, again go to the Forwarding and POP/IMAP tab. And in the Forwarding section, select the Forward A Copy of Incoming Mail To option.
- Thereafter, select what you want to do with the Gmail copy of the received email. It is advised to keep a copy of the receiving email in your Gmail inbox as well.
- Finally, hit the Save Changes button at the bottom of your screen.
Note:
Spam messages will not be included when your new messages are forwarded.
In order to turn off forwarding, simply go to the Forwarding and POP/IMAP tab in your Gmail Settings and select the Disable Forwarding option. Once this is done, don’t forget to click on the Save Changes button at the bottom of the screen.
With this done, the email address you provide here will receive a copy of all your Gmail emails that arrive in your inbox from now on and, thereby, will lead to creating a backup of your Gmail emails.
As a tip, you can use this same method for making a backup of your webmail email account in Gmail by forwarding your Webmail emails to your Gmail account.
Use Third-Party Gmail Backup Applications
If the above lengthy processes overwhelm you, and you are still looking for how to back up emails from Gmail, then this is the section for you.
You can utilize a third-party Gmail archive or backup creator application if you want a long-term, automated solution for making a backup of your Gmail emails.
You can consider using GMvault for your Gmail backup. This is an open-source application available for Mac, Windows, and even Linux devices. This popular free tool allows you to schedule backups to occur automatically, which is convenient when you forget to back up your Gmail account.
It’s also useful for transferring mail from one account to another. There is no graphical user interface because it is command-line based. However, by understanding a few easy instructions, you can do a lot with it.
However, if you find it difficult to use, you can always use a reliable third-party tool for taking your Gmail backup. But you need to make sure that you are using the right tool or application before purchasing a Gmail backup subscription. Also, before settling on a final product, read customer reviews and try out a free trial pack, if there are any.
Moreover, be aware of fraudulent apps, as there can be many of those who just pretend to help you and steal your data. Thus posing a threat to your security and privacy.
Sources:
Read More: