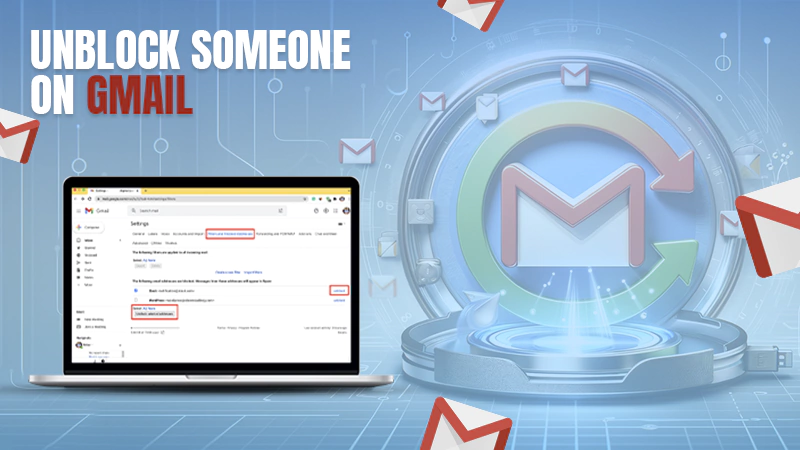
How to Set Up Roundcube Webmail on Outlook?
Roundcube is an open-source web-based email client that you can use to receive, send and manage your emails from any web browser. Setting up Roundcube on Outlook is not a very difficult task.
How to Set Up Roundcube Webmail on Outlook?
Step 1: Install Roundcube Webmail on Your Computer
- Go to the Roundcube webmail page https://roundcube.net/en/download.html.
- Download the Roundcube webmail software and extract it. You will get the Roundcube.zip file.
- Now unzip it and install it.
- Click Next, accept the license agreement, and then click Finish. Once installation is done, the Roundcube webmail program will open.
Step 2: Add Roundcube
- Account In the Roundcube webmail, click on ‘Add an account’.
- Select the ‘Other’ option and then select ‘Outlook.’ Enter your Microsoft Outlook account’s email id and password. Then click on the ‘Next‘ button.
Step 3: Configure Roundcube Webmail
To use Roundcube webmail with Microsoft Outlook, you need to configure the settings. Click on ‘Preferences.’
Step 4: Configure the Settings
In the ‘General’ tab, you can enable ‘Auto login’ and ‘Auto-login method.’ Auto-login will automatically log you into your Roundcube webmail account when you start your browser.
For auto-login, you can choose between ‘Login at startup’ and ‘Login at startup via HTTP proxy.’
You can also choose the ‘Login method‘ as either ‘Windows login‘ or ‘Login via SSL.’ You can disable the ‘Lock your session‘ option at your convenience. You can also select the ‘Enable SSL‘ option if you want to use the SSL option for your webmail.
Step 5: Configure POP/IMAP Account
In the ‘Accounts‘ tab, you need to configure the settings. Click on the ‘POP3‘ button and click on ‘Add.’ Enter the hostname of the POP server and then click on ‘Next.’
Step 6: Configure SMTP Account
In the ‘Accounts‘ tab, you need to configure the settings. Click on the ‘SMTP‘ button and click on ‘Add.’ Enter the hostname of the SMTP server and then click on ‘Next.’
Step 7: Configure the SSL Certificate
In the ‘General‘ tab, you can set the SSL certificate. Click on the ‘SSL‘ tab and click on ‘Certificate.’
Step 8: Enable/Disable the Auto-login Option
To enable auto-login, click on the ‘Auto login’ tab and check the ‘Enable‘ box. You can also select the ‘Auto login method’ as either ‘Login at startup‘ or ‘Login at startup via HTTP proxy.’ To disable auto-login, uncheck the ‘Enable’ box.
Step 9: Setup Roundcube
Webmail Password In the ‘General‘ tab, you can set the password for your account. Enter the new password and then click on ‘Next.’
Step 10: Save the Settings
Click on ‘Finish‘ to save the settings. You can also change the default language of your webmail.