How to Create New iCloud Email? Complete Guide to Set Up iCloud Account
Having an iCloud account makes things easy for Apple users, as it allows them to store their data and access their email anywhere. Being an Apple user, iCloud email is my favorite thing because it provides 5 GB of free storage. Initially, I faced a bit of a problem as I was unaware of how to create an iCloud email, but once I set up iCloud mail, syncing emails got very easy.
If you are also a new user and struggling with how to make a new iCloud email, this article will enlist the easiest ways to set up an iCloud account on different devices.
How to Create a New iCloud Email Account on iPhone?
iCloud Mail is a cloud storage and computing service offered by Apple that allows users to sync their data across devices. If you want to try your hands on iCloud and are worried about how to create an iCloud email, we got you covered. The below-given instructions will help you set up iCloud account on your iPhone: –
Step 1: To create an iCloud email account on your iPhone, first open ‘Settings.’
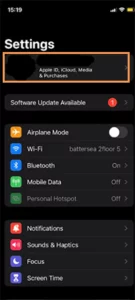
Step 2: Now, tap on your ‘Profile Photo’ present at the top of the screen.
Step 3: Choose ‘iCloud Mail’ and toggle the switch to the on position.
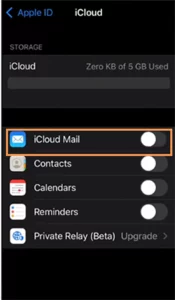
Step 4: Tap on the option of ‘Create’ from the Pop-Up Window.
Step 5: Enter the ‘Email Address’ you want to choose and press Next.
Step 6: Lastly, ‘Confirm’ that the ‘Email Address’ you have entered is correct.
Remember that you won’t be able to change the email address once it is created so be double-sure before entering the email address. Now, let’s see how to make an iCloud email on iPad, iPod, and other iOS devices.
How to Create an iCloud Email on iPad and iPod?
The process of creating an iCloud email account on an iPad and iPod is pretty much similar to an iPhone, and you just have to make some adjustments in settings.
Step 1: Click on the cog icon to open ‘Settings.’
Step 2: Tap on your ‘Profile Photo’ present at the top-left side of your screen.
Step 3: Hit the ‘iCloud icon’ that has blue clouds.
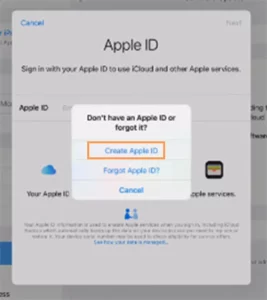
Step 4: Select the option of ‘Create Apple ID.’
Step 5: Next, ‘Enter your First Name, Last Name, and Birthday’ in the required columns.
Step 6: Insert the ‘Email ID’ of your preference and tap Next.
Step 7: Type your ‘Contact Number’ in the required columns.
Step 8: Now, you will receive a six-digit verification code on your mobile number. Enter the ‘Verification Code’ in the required column to proceed further.
Step 9: Lastly, read and confirm the ‘Apple Media Services Terms and Conditions,’ and you are good to go.
This was all about the process of creating an iCloud email account on an iPod and iPad. The method of creating iCloud email on Mac is slightly different, so if you are a Mac user, the subsequent section will help you set up iCloud email on your MacBook.
Method to Make an iCloud Email on Mac
Thoroughly read and follow the below-stated instructions to make an iCloud email on Mac: –
Step 1: Firstly, open the ‘Apple Menu’ on your Mac and select ‘System Preferences’ from the menu.
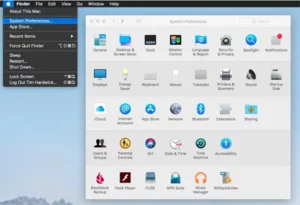
Step 2: If you have macOS 10.15 or a later version, select your ‘Apple ID’.
Step 3: Now, tap on the option of ‘iCloud.’
Step 4: Choose the option of ‘Mail’ from the given menu.
Step 5: Now, the system will assist you in creating iCloud mail by providing further instructions. So all you have to do is carefully read the instructions and enter the required input in the respective columns.
|
You would be surprised to know that you can set up an iCloud account even on Android devices. So, read the next section to know the precise method of setting up an iCloud account on Android devices.
How to Create an iCloud Email Address on Android?
Unfortunately, Apple doesn’t support creating a new iCloud email account directly from an Android device. However, you can use the Android device to monitor an existing Apple ID and iCloud email.
In simple words, if you want to monitor your Apple ID or iCloud ID on an Android device, you first have to create an iCloud ID on an iPhone or other iOS device. For that, switch on iCloud mail in settings >> click on create >> enter email address >> confirm.
That’s it now, install sync for the iCloud mail app, log into the iCloud email account, and you are all set to use your iCloud ID. If you want to access your iCloud mail on your Desktop but don’t know how to worry not, we got your back. The successive section will assist you in setting up an iCloud account on your Desktop.
The Process to Create iCloud Email Account on a Desktop
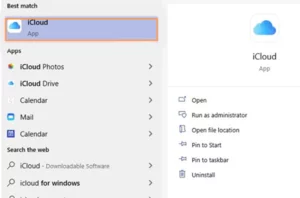
Luckily, Apple allows accessing iCloud on a Windows computer too. So, if you are wondering how to get an iCloud email on a personal computer? carefully read and follow the below-given instructions: –
Step 1: To get an iCloud email on a personal computer, firstly, you need to ‘Create an iCloud Account on an Apple device’.
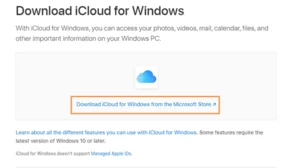
Step 2: After this, install iCloud for Windows.
Step 3: Then, ‘Launch the iCloud Application’ on your Desktop.
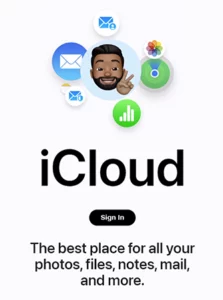
Step 4: Now, enter your ‘Apple ID and Password’ in the required columns.
Step 5: Hit the icon of ‘Sign in.’ It will prompt you to the iCloud Home Screen.
Step 6: Lastly, ‘Tick the Box’ alongside the options of Photos, Contacts, Calendars, and Bookmarks.
Now, you can easily access your iCloud email even without an Apple device via Windows email platforms like Outlook or Windows Mail.
The Trick to Creating iCloud Email Alias
iCloud email Alias is becoming a popular choice nowadays as it enables users to hide their iCloud email address from a recipient. Besides this, it also allows managing mail in your inbox and monitors unwanted emails or spam. If you want to set up iCloud Email Alias, these steps will definitely be helpful: –
Step 1: Type iCloud.com in your browser, and it will redirect you to the home page of iCloud.
Step 2: Now tap on the icon of ‘Sign in’ and enter your ‘Apple ID’.

Step 3: Tap on the option of ‘Mail’.
Step 4: Select the icon of ‘Settings Cog’ present in the bottom left corner of the screen.
Step 5: Choose your ‘Preferences’.
Step 6: Next, select ‘Account Tab’ and tap on the option of ‘Add an Alias’.
Step 7: Enter the Alias name which will become your email address.
Step 8: Insert a ‘Full Name’ that will appear in the form section while sending the email.
Step 9: Select a label and label color to categorize which emails are sent to the Alias.
Step 10: Lastly, tap on the option of ‘Done’.
|
Method to Disable or Delete an iCloud Alias
Follow the following steps to disable or delete the iCloud Alias: –
Step 1: Firstly, open ‘iCloud.com’ on your web browser and sign in with the help of your ‘Apple ID’.
Step 2: Choose the option of ‘Mail’.
Step 3: Open settings by tapping on ‘Setting Cog’ in the bottom left corner of the screen.
Step 4: Now, ‘Choose Preferences’ from the given menu.
Step 5: Tap on the ‘Account tab’.
Step 6: Next, choose Alias you want to disable or delete.
Step 7: Tick the boxes of ‘Disable Alias’ or you can choose the option of ‘Delete.’
The moment you will hit the delete or disable option, your iCloud Alias will be deleted or disabled. Besides this, iCloud facilitates its users by allowing them to create a separate email accounts for their children. So let’s discuss how to make a separate iCloud email account for children.
How to Make a New iCloud Email Account for Your Child?
As mentioned in the Terms and Conditions of iCloud, a user must be of 13 Years of age or older to create and operate an Apple account. Apple allows parents to create an Apple ID for kids under 13 years.
Creating a separate account for your children prevents your personal data from getting shared with your kids. In addition, you can get age-based control if you set up a separate iCloud email account for your child. To access all these benefits, you would need a credit card for identifying your identity.
Follow the steps given below to create a separate iCloud email account for your child: –
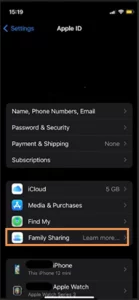
Step 1: Open ‘Settings’ and tap on your ‘Profile Photo’.
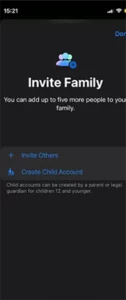
Step 2: Select the option of ‘Family Sharing’ from the drop-down menu.
Step 3: Choose the option of ‘Continue’.
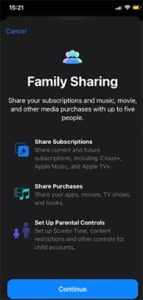
Step 4: Scroll down and select the option of ‘Create a Child Account’.
Step 5: Now, a parental consent page will open on your screen. ‘Enter the CVV Code’ associated with your credit card.
Step 6: Select the option of ‘Done’ after entering the CVV code.
Step 7: Carefully read the ‘Apple Family Privacy Disclosure’ and agree to it.
Step 8: Now, enter the ‘Child’s First, Last Name, and Date of Birth’ in the required columns.

Step 9: Type an ‘Email Address’ of your choice for your child.
Step 10: Hit the option of ‘Create Email Address’.
Step 11: Select an email address that you would prefer to associate with your child’s account and tap on the option of ‘Next’.
Step 12: ‘Enter a Password’ and confirm the password by retyping it.
Step 13: Then, tap on the option of ‘Next.’
Step 14: Insert a ‘Phone Number’ for the verification process. Doing this will notify you when your child tries to access the email on a new device.
Step 15: Meticulously read and click agree on the ‘Terms and Conditions.’
You can also select the option of ‘Ask to Buy’ to get notified if your child attempts to buy something from the App Store.
Facing a problem during iCloud setup is quite common, and many users have reported issues in setting up their iCloud accounts. In case you also face any problems, you can try the below-given tricks.
Ways to Fix Problems Related to iCloud Account Setup
These are a few problems related to the setup of your iCloud account:
If you are facing any technical error or issue while setting up your iCloud account, check that the email address you have selected shouldn’t already be in use. In case the email is already in use, a notification will pop up on your screen, and you will get suggestions in the suggestion box.
There are instances when people face problems while turning on mail. If you struggle with the same, try to sign out of iCloud mail and then sign in again. You need to remember your Apple ID while re-signing into your iCloud account otherwise, you won’t be able to access your iCloud mail.
Reasons to Create an iCloud Account on Apple Devices
You need to create an iCloud account on an Apple device mainly due to two reasons, and they are as follows: –
- For accessing some of the Apple services
The majority of services provided by Apple can be accessed through Apple devices, but if you want to use the same services on Android devices, you need to create an iCloud email first on Apple devices. After creating an Apple ID, even Android devices can be used for accessing iCloud mail.
- Using iCloud on Desktop and Android Devices
Though iCloud is primarily created for Apple users, you can also access it on a Windows-supported desktop, and for that, you need to create iCloud email on Apple devices. An Apple ID is required because you cannot directly create an iCloud account on a Windows and Android device.
Google as an Alternative Option for Android Users
If you are an Android user, don’t get disheartened, you can use Gmail as an alternative option. Gmail is a good option because it offers similar services and more storage than iCloud. For a better analysis, let’s have a look at some differences between Gmail and iCloud email.
Comparison Table Between Gmail and iCloud Email
Gmail and iCloud Mail are the two popular names that pop up while discussing the best email platforms. The features and benefits offered by Google and Apple’s flagship email services help them stand above the rest and be on top. Let’s look at some of the differences and compare which one is better.
| Differentiating Parameter | Gmail | iCloud Email |
|
Basic Difference |
|
|
|
User Experience |
|
|
|
Price |
|
|
|
Security |
|
|
Both Google and iCloud email have a vast user base and distinctive features to enhance the user experience. Deciding the best one from Google and iCloud email is a subjective choice and completely depends on your personal choice and the device you use. If you are an Android user, Gmail is the only option for you. But if you have Apple devices, you can use iCloud email along with Gmail, thus using the best features of both.
Conclusion
Creating a new iCloud email is quite easy, and the aforementioned steps can accurately assist you to set up an iCloud account on different devices. Having an iCloud mail will allow you to access data and content on any device. Besides this, it also optimizes your storage by providing you access to iCloud storage. So, if you are an Apple user, it’s your sign to get an iCloud email on your Apple devices.